Label printing misalignment can drive anyone up the wall. We've all been there, staring at a sheet of misaligned labels, wondering what went wrong, and feeling overwhelmed with no clue what caused it.
To fix it properly, you need to treat it like a mystery: before jumping to conclusions, it's essential to observe the symptoms and use them to guide you in diagnosing the root cause of the misalignment. Chasing the wrong assumptions only leads to more frustration.
Let’s first take a closer look at the three types of misalignments and how to examine them for clues about where to dig deeper in our quest.
Already know what the problem looks like? Jump to the quick alignment answers, then use the topic-specific FAQs throughout this guide for more detailed help.
There are three types of misalignments. Distinguishing between them helps you save time and diagnose the root cause more quickly.
Further down, we analyze all the root causes and explain how to fix each type of misalignment.
But if you want to jump straight to action, first look at your printed label sheet and determine which type of misalignment
you're seeing (scaled, shifted, or both).
Then use the list of links under it to go directly to the recommended fixes.
The lists are ordered by how frequently we've encountered each cause while helping customers diagnose and fix misalignment issues. The likelihood percentages are approximate, based on our observations of how often each cause occurred.
Scaled
The positions of the printed labels have expanded or shrunk relative to the positions of the die-cut labels.
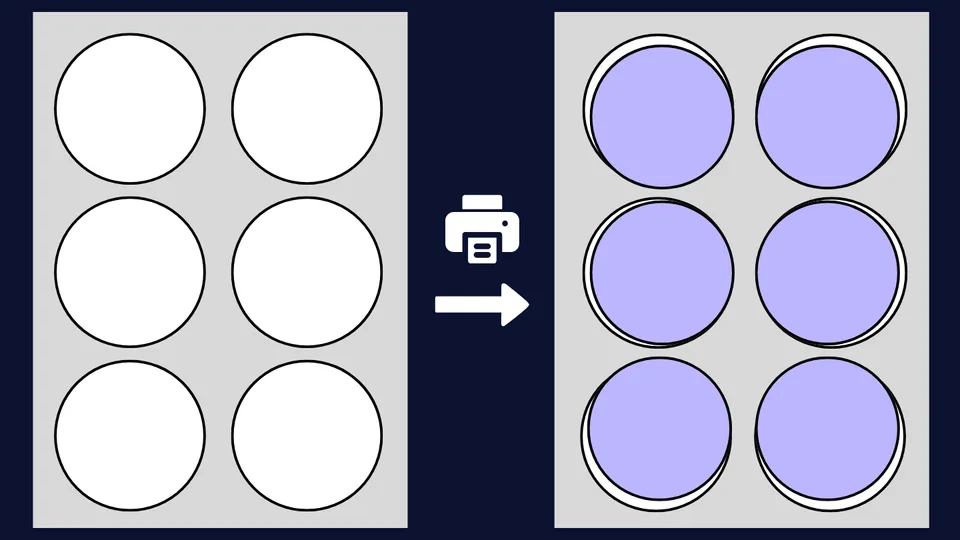
Below is a list of possible causes and fixes for this type of misalignment:
Shifted
The printed labels have all shifted equally in one direction compared to where the die-cut labels are on the sheet.
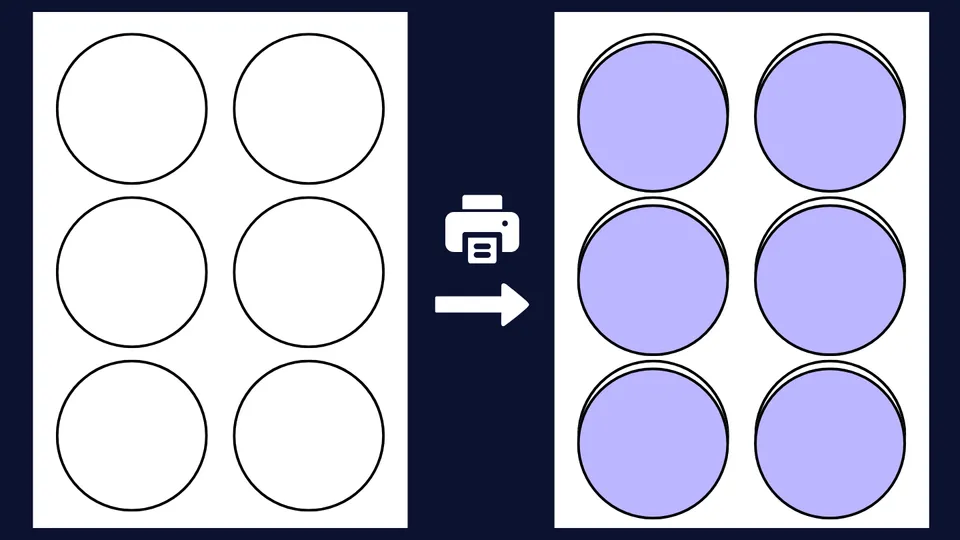
Below is a list of possible causes and fixes for this type of misalignment:
Mixed
The printed labels appear to be both shifted and either expanded or shrunk.
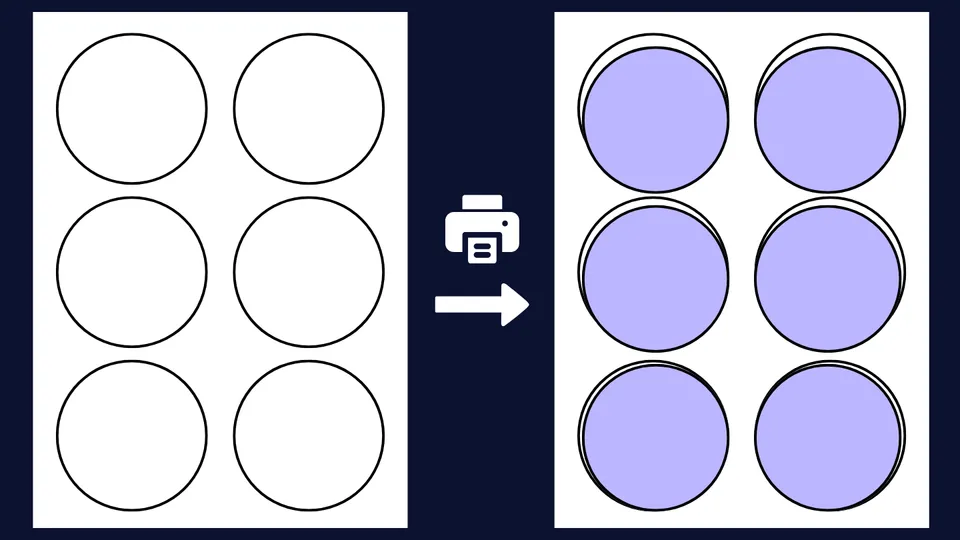
Apply any combination of the suggested fixes listed above.
These answers are based on the alignment problems we've encountered while working with label templates across 102 different label brands. Compare your printout with the symptoms below and choose the question that best matches the type of alignment problem you're seeing.
For the fastest diagnosis, first determine whether your printout is scaled, shifted, or a mix of both. More specific questions appear beside the relevant troubleshooting sections below.
Most label alignment problems come from one of five places: the label sheet, template, application print settings, printer-driver settings, or the printer's paper feeding. Start with the easiest checks: make sure the paper size matches your sheet, print at Actual Size or 100%, and set application margins to 0. Based on thousands of cases we've encountered in the last two years, those three settings alone resolve approximately 60-70% of alignment problems.
Look at how the error changes across the sheet. If the labels gradually become more misaligned as you move across or down the page, the printout is scaled. If every label is off by roughly the same amount and in the same direction, the printout is shifted. Sometimes you'll see both patterns at once; fix the scaling problem first, then correct the remaining shift.
This is often described as printer creep, print drift, or progressive misalignment. The most common cause is scaling: the printed layout is slightly larger or smaller than the physical label layout, so the error accumulates with every row. Set the print scale to Actual Size or 100% and never turn on settings like: Fit to Page, Shrink, Auto Scale or Fit to Printable Area. Also confirm that Letter or A4 is set correctly in both the application and printer driver.
That usually points to a scaling problem. When a page is slightly enlarged or reduced, labels near the center may still look reasonably aligned while labels farther from the center become increasingly displaced. Check print scaling first, followed by the paper size and any scaling applied by the printer driver.
A consistent displacement across the entire sheet is a shift-type alignment problem. Check application margins, printer-driver margins, paper guides, and paper feeding. Turn off borderless printing and automatic positioning adjustments. If everything else is correct and the remaining error is small and consistent, an offset can compensate for it.
Need a more specific answer? Continue to the Gang of Five, where related FAQs appear beside the sections on the label sheet, template, application settings, printer software, and printer hardware.
Printing labels on inkjet and laser printers is a chain process involving five key players, each one capable of causing alignment issues if it doesn’t play its part correctly.
Below, we analyze them one by one, providing you with a comprehensive, thorough, and easy-to-understand guide to diagnosing and fixing all possible root causes.
Note that they are ordered according to the sequence of the printing process, not by the likelihood of causing misalignment.
A label sheet is an adhesive-backed paper sheet, typically in Letter or A4 size, containing die-cut label shapes that can be peeled off after printing. It is usually identified by a combination of the brand name and a product code, for example, Avery® 5160.
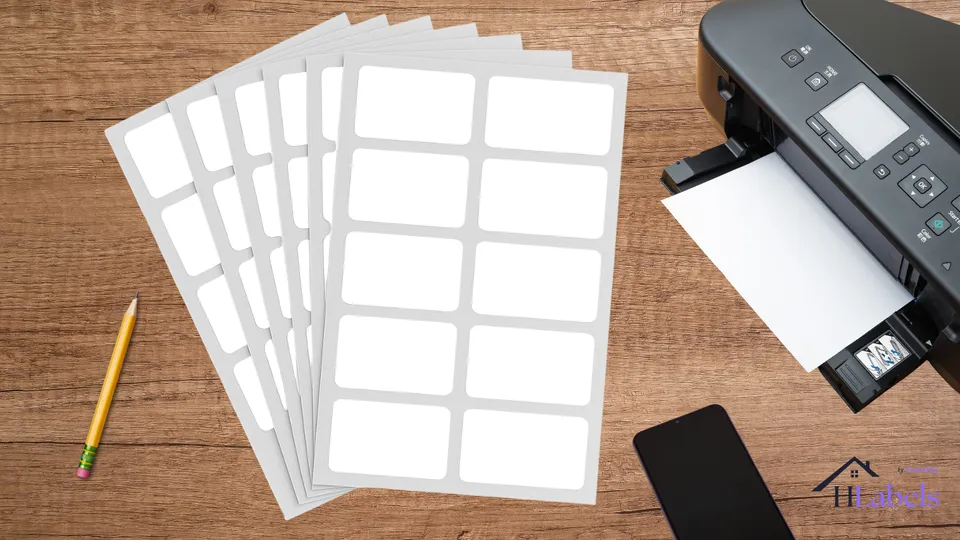
The label sheet may be the source of the problem for two reasons:
However, this is very rare; based on our experience with 102 different brands, it accounts for only about 2% of cases. For that reason, you should consider it as the cause only after ruling out the other players listed below.
Use the naked eye or a ruler to compare the position of the label die-cut lines on the physical sheet with the label outlines in the template document you're using for that product.
Pay close attention to the top, bottom, left, and right margins. For clarity: the top margin is the distance from the top edge of the first row of labels to the top edge of the sheet. The same logic applies to the other three margins.
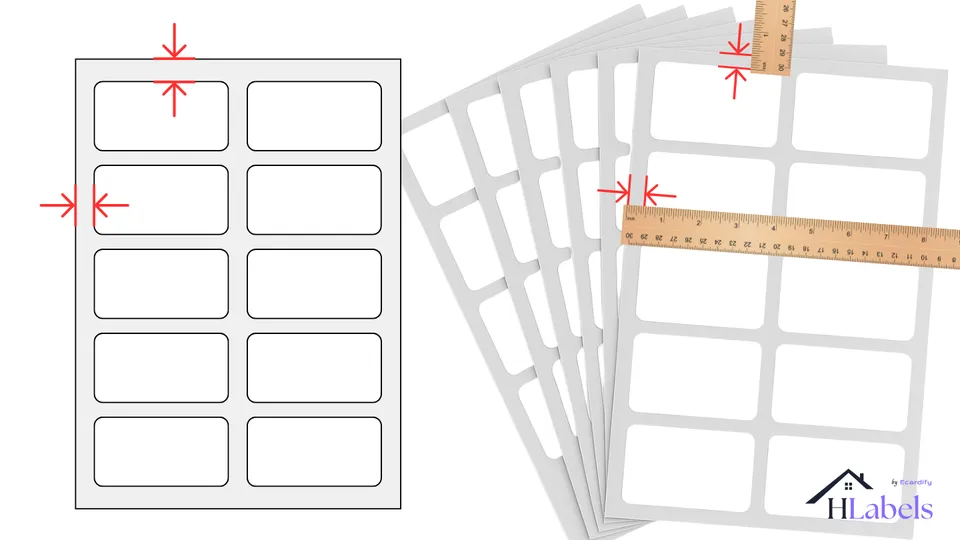
If the top and bottom margins (as well as the left and right) are symmetrical in the template document but asymmetrical
on the physical label sheet, then voilà, you’ve found the cause, or at least one of the causes, of the misalignment.
Note that some label sheet layouts are intentionally designed to be asymmetrical.
Bottom line: as long as both the physical label sheet and the template document reflect the same layout, neither one is at fault.
Many label makers provide margin dimensions for their products, making verification easier.
Hlabels, and some
brand-specific applications,
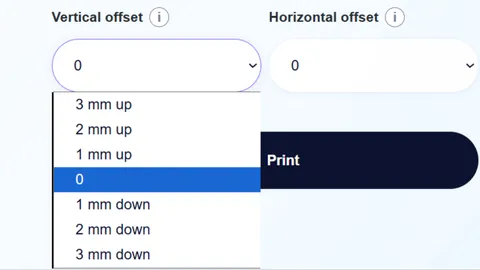
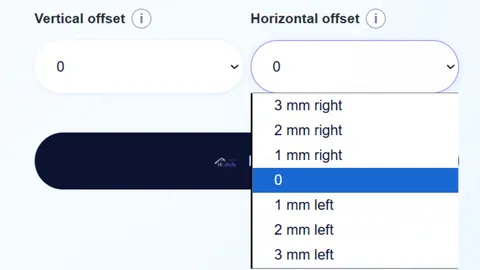
provide offset settings that let you shift the printed labels slightly
in any direction: up, down, left, right, or even a combination of these.
If the misalignment caused by asymmetry falls within the range of 1 to 3 millimeters (approximately 0.04 to 0.12 inches),
applying these settings can compensate for the shift-type misalignment and correct the issue.
See how to apply both
vertical
and
horizontal
offsets, using Avery® 5160 as the example.
If the layout specification of a label sheet product has changed, the only solution is to obtain and use its updated
template.
When using a common or brand-specific application, you'll need to contact the label manufacturer directly.
If you're using Hlabels, feel free to reach out to us and request that the new template be added to the system.
These questions help determine whether the physical sheet itself, rather than your software or printer settings, is causing the problem.
It can happen, although we've found it to be relatively uncommon. A sheet can be die-cut slightly differently from the expected specifications, or a manufacturer can change a product's layout between batches. If an older batch prints correctly but a newer batch of the same product doesn't, compare their physical measurements before changing your printer settings. See The Label Sheet.
Usually not. If every label is shifted by approximately the same small amount, an offset is often the easiest solution. Hlabels provides horizontal and vertical offsets of 1 to 3 mm, allowing you to move the complete printout slightly up, down, left, or right without altering the underlying template.
A template is a digital representation of the layout of all the labels on a sheet for a specific product. Read more about templates.
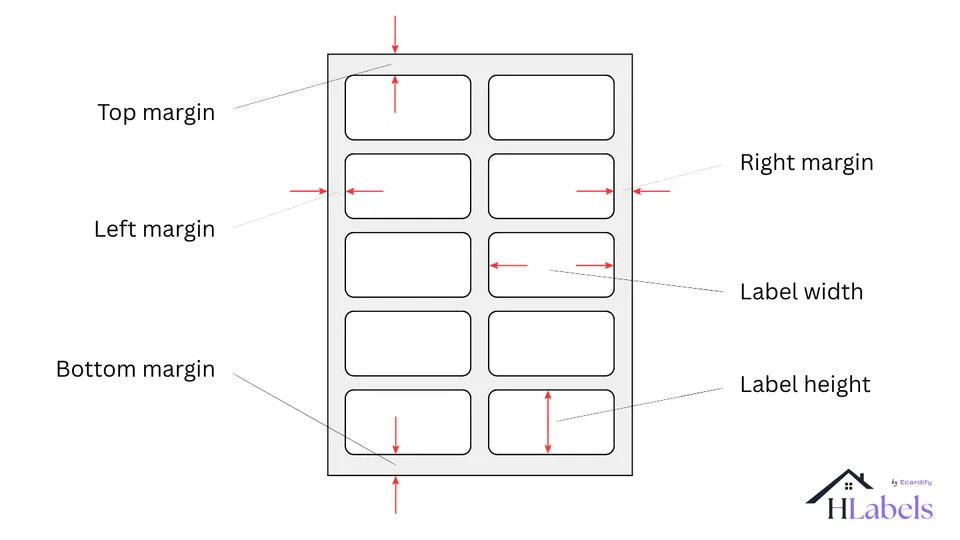
If the template does not accurately reflect the exact layout of the labels on the label sheet, it will inevitably cause alignment issues. However, this is very rare; based on our experience with 102 different brands, it accounts for only 2–3% of cases. For that reason, you should consider the template as the cause only after ruling out the other players listed below.
Perform the same checks and apply the same settings you would use when dealing with faulty label sheets. As before, if both the physical label sheet and the template document reflect the same layout, then neither is at fault.
Use these answers when the problem appears tied to a specific label product, template geometry, a small uniform offset, or visible white edges around the design.
First confirm that you're using the correct Avery® 5160 label template and that you're printing on Letter-size paper at Actual Size or 100%. Then check margins and the printer driver's paper size and scaling settings. If every Avery® 5160 label is consistently shifted by only a small amount after those settings are correct, a horizontal or vertical offset can compensate for normal printer-feed variation.
Compare the template dimensions with the physical sheet using a ruler. Start with the most obvious check: make sure the width and height of a single label match. Then compare the top, bottom, left, and right margins. Do not rely on measuring and comparing the distance between labels, because even a small measurement error can accumulate across rows or columns and easily lead to the wrong conclusion. See How to tell if the Label Sheet is causing Misalignment.
No. An offset moves the entire layout by the same amount, so it fixes a uniform shift, not a scaling problem. If the first row is close to correct but the bottom rows are increasingly wrong, fix the scaling or page-size problem first. Applying an offset may make one part of the sheet look better while making another part worse.
Small variations in how the printer feeds and positions the label sheet can expose the unprinted label underneath a colored background, creating a thin white edge or crescent. This is often more noticeable on round labels because even a small shift can expose part of the curved edge. That doesn't always mean your template is badly misaligned; applying the Bleed setting may be enough. Hlabels automatically enlarges the printed design slightly beyond the label's cut line by 1–5%, which helps hide small normal variations in label-sheet feeding and positioning.
A border or outline that is part of the label design and placed close to the edge makes even small printing shifts easy to see. If the label sheet feeds slightly off-position, the border may appear closer to one edge than another even when the shift is very small. Designs without a visible border near the edge are usually more forgiving. If the background should print to the edge, use the Bleed setting instead of relying on a border to reach the cut line.
To generate a final, ready-to-print file, you need an application that takes your label designs, positions them accurately on the sheet, and produces a properly formatted printout. Read more about Print-ready file generator applications.
The format of the print-ready file will depend on the Print-ready file generator you are using. When you request to print that file, the application displays a "Print" dialog where you can specify a wide range of print settings.
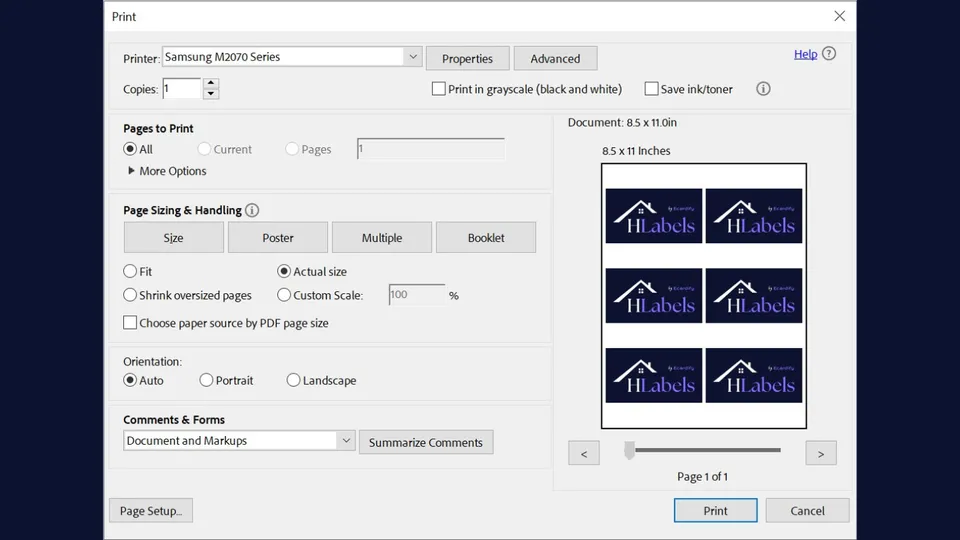
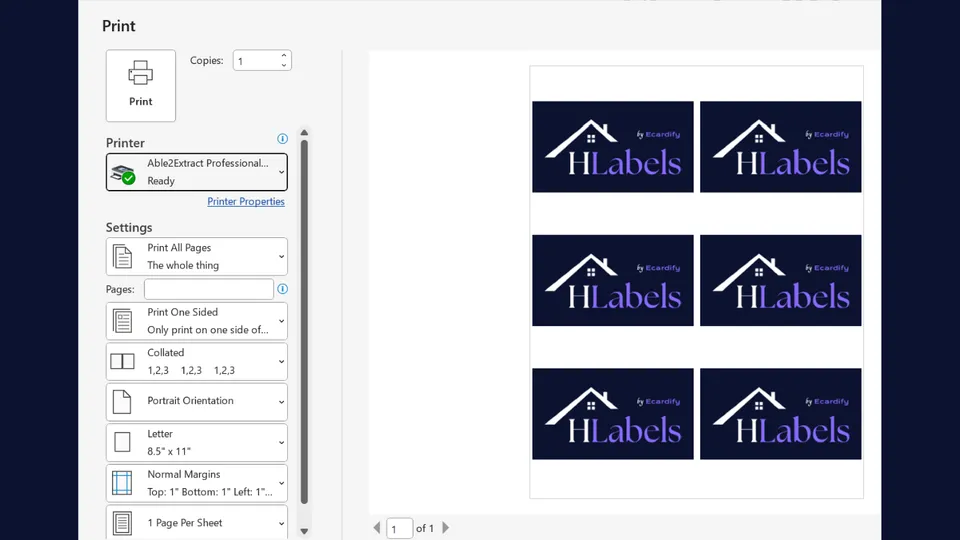
Brand-specific and integrated applications (like Hlabels.com) use PDF as the printout file format.
In these cases, the "Print" dialog will be the one provided by the PDF reader installed on your computer.
If you’re viewing the label sheet PDF in your browser, you also have the option to print directly from there;
in that case, the "Print" dialog will be the one from your browser.
Instead of printing the PDF directly from your browser, it's recommended to download it to your computer, open it in a dedicated PDF reader (such as Adobe Acrobat), and print from there for better accuracy and control over print settings.
"Print" dialog settings come with default values, and three of them are often the main cause of misalignment:
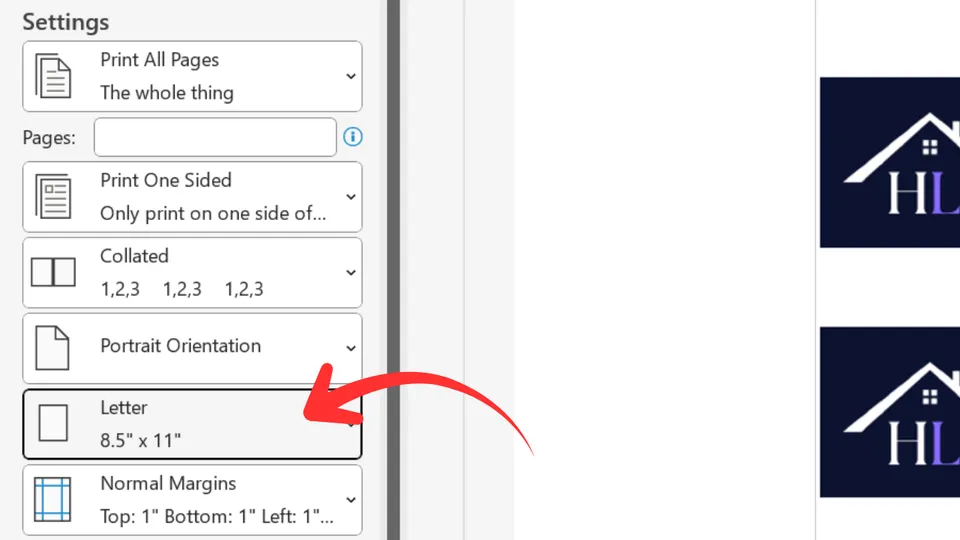
Paper Size
It should match the format of your label sheet: either Letter (8.5 x 11 inch) or A4 (297 x 210 mm). This will prevent scale-type misalignment.
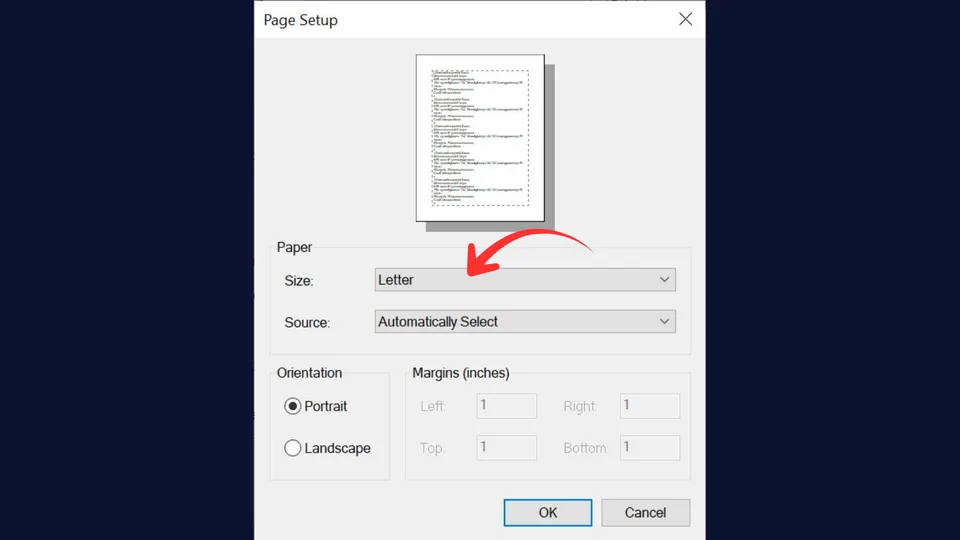
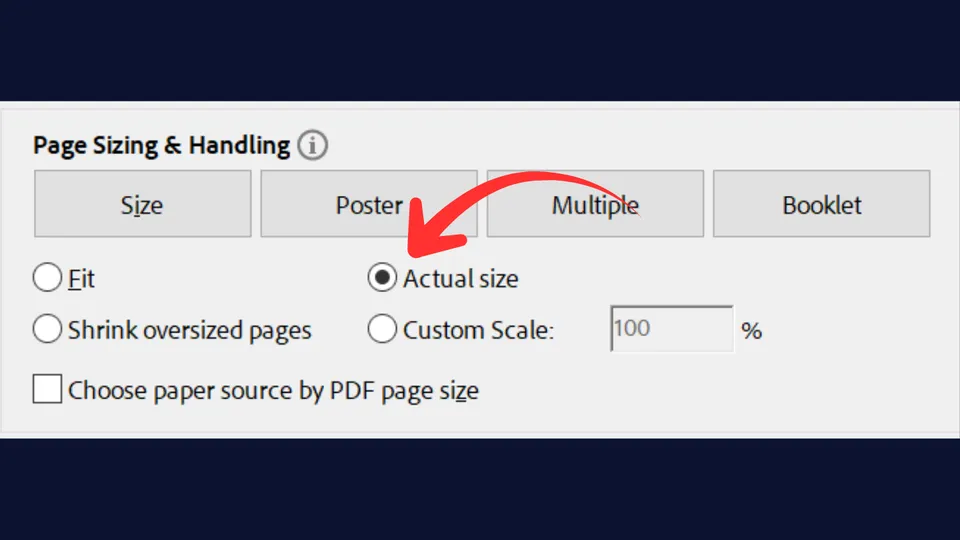
Page scaling
This should always be off, meaning the printout should be at "Actual size", never "Fit" or "Scaled". This will prevent scale-type misalignment.
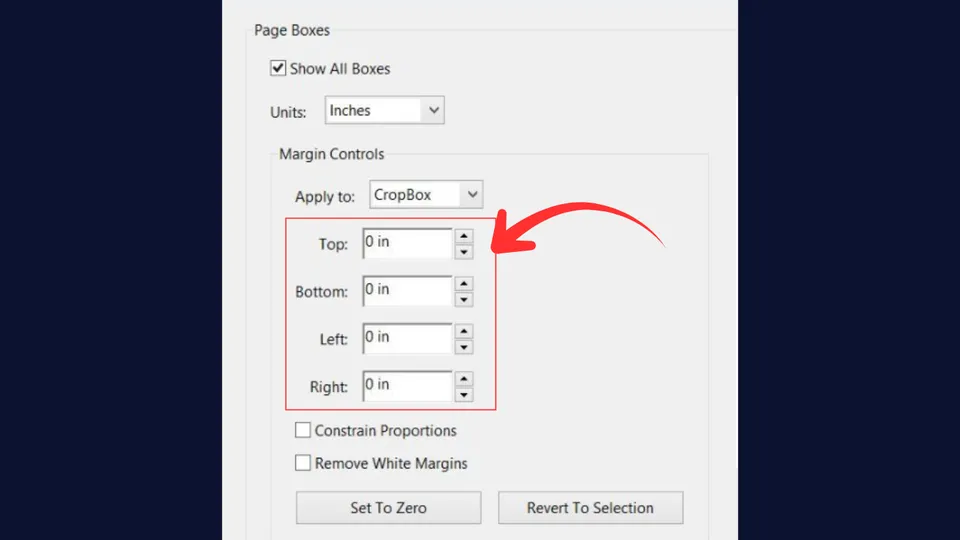
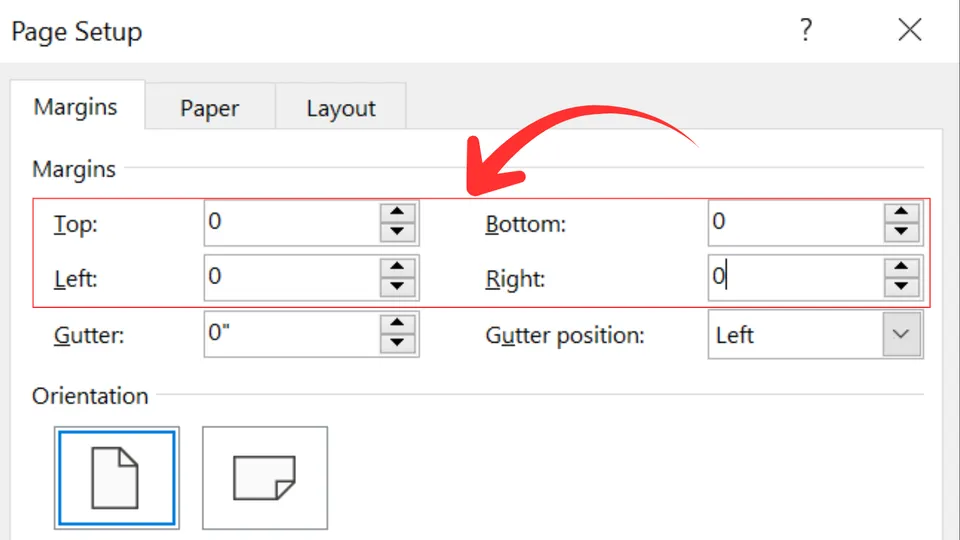
Page margins
All margins should be set to 0 (zero). This will prevent both scale- and shift-type misalignment.
Ensuring that the values of those three settings are correct eliminates approximately 60 to 70%
of print misalignment occurrences.
If the problem persists, it's time to check the other possible causes.
These are the most common questions to check in the PDF reader, browser, Word, or other application that opens the final print-ready file.
Use Actual Size or 100%. Do not use Fit to Page, Scale to Fit, Shrink, Fit to Printable Area, or similar options. Even a small scaling adjustment can cause the labels to drift progressively out of alignment. See the Page scaling check.
Yes. Label-sheet printouts are generated using the template's exact page geometry, including its built-in margins and label positions. Make sure that neither the application you are printing from nor the printer software or driver adds additional margins to the printout. Extra margins can shift the entire label layout and cause misalignment.
A4 and Letter are different physical paper sizes, so using the wrong setting changes how the label layout fits the page and can cause scaling or shifting that throws the labels out of alignment. Check the paper size in both the application and the printer settings, because they can be configured independently.
In most cases, label misalignment is introduced during printing rather than by the generated PDF. Start by checking the application print settings, printer-driver settings, and paper feeding. Paper size, scaling, margins, and feeding can all change the size or position of the printout after the PDF has been generated. Investigate the template or PDF itself only after those printing-related causes have been ruled out.
For label printing, we recommend downloading the PDF and opening it in a dedicated PDF reader such as Adobe Acrobat. Browsers are used for many different kinds of printing and may retain settings from previous print jobs, such as scaling, margins, or paper size, that are not appropriate for label sheets. A dedicated PDF reader also makes important settings such as Actual Size, Paper Size, and Scaling easier to see and verify before printing. See Application Print Settings.
A remembered or changed print setting is one of the first things to check. Browsers, PDF readers, operating systems, and printer drivers can retain settings from another print job or change behavior after an update. Recheck paper size, scaling, and margins. If only one label product has suddenly stopped aligning, compare the physical sheet with its template.
This is the software layer provided by your printer manufacturer. You can access it through the 'Preferences,'
'Printer Properties,' or 'Advanced' button in the 'Print' dialog of your
Application Print Settings
.
Among other functions, this software provides a user interface that allows users to adjust printer settings.
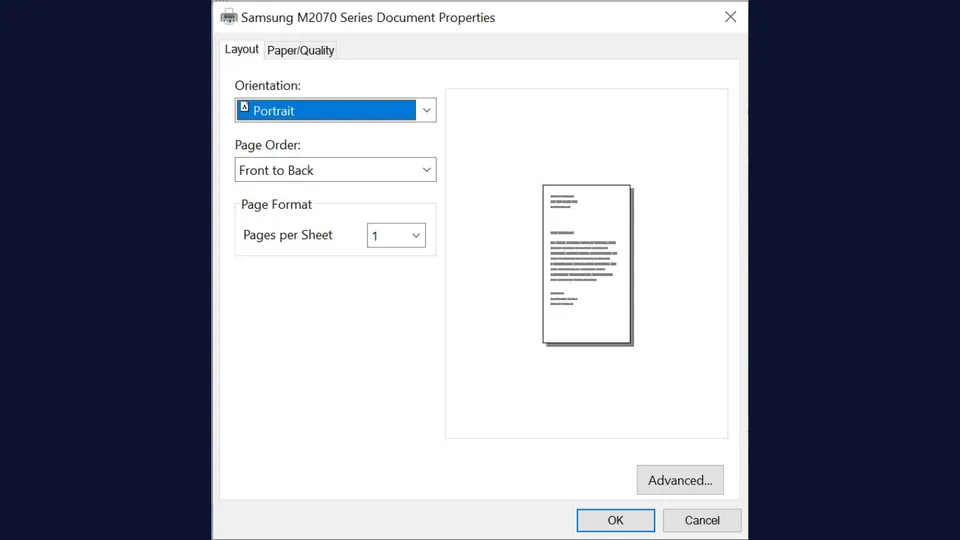
The right printer software (driver) settings are essential, as some of these settings can silently interfere with or override application print settings, causing misalignments that are hard to diagnose. Based on our experience, they account for about 20% of print misalignment occurrences.
Here is a list of the ones you should check:
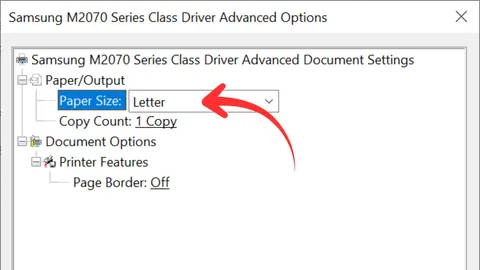
Paper size
Your application may be set to print on A4, but the printer driver might be defaulting to Letter, or vice versa. This mismatch can cause the printout to shift and/or scale.
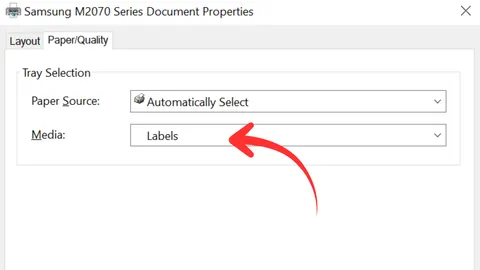
Paper type
Set this to "Labels" or "Plain". Other settings could cause shift-type misalignment.
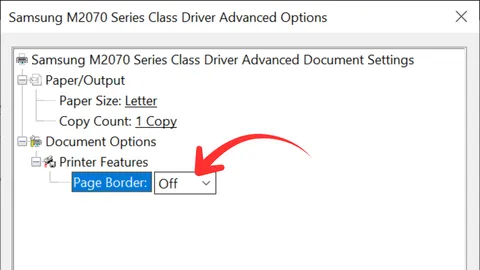
Borderless printing
Turn off for label printing; some printers shift and/or scale content when this is enabled.
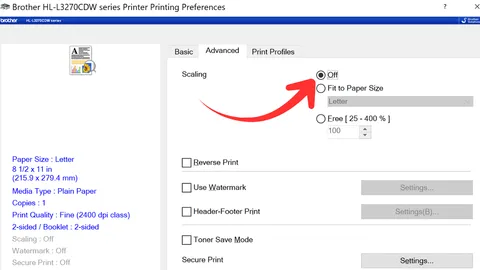
Scaling
Even if the print setting in your application is set to "Actual size" or 100% scaling, the printer driver may still apply its own scaling or "fit to page" logic. Make sure to disable any "Fit to Printable Area", "Borderless Printing", "Fit to Paper size" or "Auto Scale" options. Otherwise, it will cause scale-type misalignment.
Margins
Printer drivers often apply non-printable area compensation or internal margins (especially for inkjet printers).
These can shift and/or scale
the print area slightly, even when margins are set to zero in the application.
Make sure that:
"Printable Area: Maximum" is turned ON.
"Borderless Printing" is turned OFF.
Auto-correction or alignment settings
Some printer drivers apply subtle adjustments; disable if possible. It could shift the printout.
Tray selection
Some printers may misalign when printing from certain trays. Rear feed is often better for labels, as it typically provides a straighter paper path. Avoid using trays that bend or curve the paper heavily, as this can lead to shifting during printing.
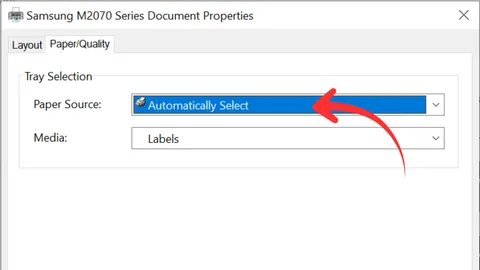
Your printer driver can change paper size, scaling, margins, media handling, and borderless behavior even when the application settings look correct.
Yes. The printer software or driver can apply its own paper size, scaling, margins, borderless enlargement, and other adjustments after the application sends the print job. Even if the application print settings are correct, the printer driver can still resize or reposition the label-sheet printout. Check Printer Properties, Preferences, or Advanced Settings and make sure the printer driver's paper size, scaling, margin, and other relevant settings are not altering the layout.
Yes, in most cases. Keep borderless printing off for label sheets because many printers slightly enlarge the printout when borderless printing is enabled to achieve edge-to-edge printing. Even a small enlargement can cause scaling and progressively increasing alignment errors across a sheet of precisely positioned labels.
If your printer driver allows you to set its margins to 0, use that first. Some printers instead provide a Maximum Printable Area, Expand Printable Area, or similarly named setting that reduces the margins reserved by the printer driver and allows more of the physical page to be used. This can help when labels near the outer edges of the sheet are not printing completely. Make sure the setting does not scale or enlarge the page, and do not confuse it with borderless printing.
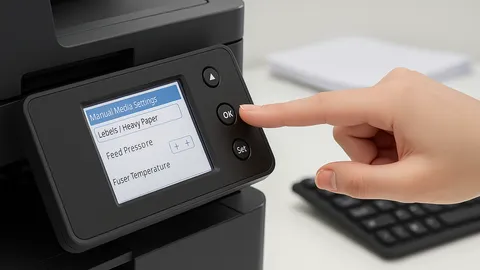
If your printer provides a Labels media setting, start there. Depending on the printer and label material, Plain Paper, Heavy Paper, or another media type may be more appropriate. This setting can affect how the printer feeds the sheet, which is especially important with thick, glossy, or specialty label stock. Check both the printer software Paper Type or Media Type setting and any media or paper-type setting available on the printer itself, and follow the printer and label-sheet manufacturers' recommendations when available.
Not necessarily all, but the same alignment principles apply to most home inkjet and laser printers, including common brands such as HP, Canon, Epson, and Brother. The names, locations, and availability of individual settings can vary by manufacturer and model. Some printers may not provide every setting described on this page, while others may handle certain adjustments automatically. Look for equivalent settings involving paper size, scaling, margins, borderless printing, media type, and paper source.
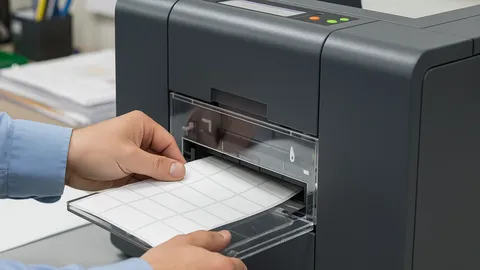
The printer is a mechanical device that needs to be inspected and properly set up, especially when printing precision-sensitive materials like label sheets.
If you've already checked and ruled out all other possible causes of the misalignment issue, it's time to take a closer look at the printer itself. Follow the checklist below.
Feed Tray
Paper Guides
Paper feeding
Rollers
Media Type
Use these questions when alignment changes from sheet to sheet, varies between print attempts, or seems related to how the label stock moves through the printer.
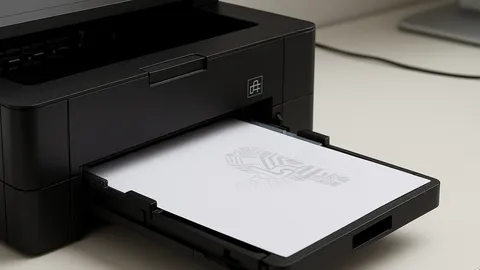
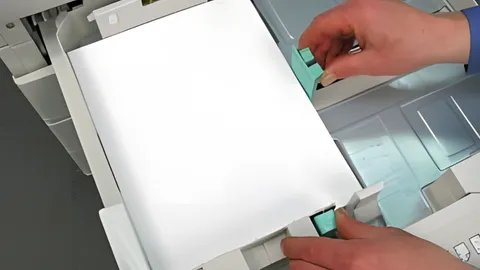
Yes. The width guides should sit snugly against the label sheet without squeezing it. Guides that are too loose can let the sheet move sideways, while overly tight guides can skew or bend it. If the horizontal position changes from one print to another, check the paper guides early in your troubleshooting.
A rear feed or manual feed tray is often a good choice when your printer provides one because it generally gives thicker label stock a straighter paper path. Avoid forcing a label sheet through a tray that bends or curls it heavily if another supported feed path is available.
That often points to a paper-feeding problem rather than scaling. The first sheet may feed correctly while later sheets move slightly inside the tray or are picked up differently. As a troubleshooting test, feed one label sheet at a time. If that solves the problem, check the paper guides, tray setup, and your printer manufacturer's instructions for loading label stock.
Inconsistent alignment usually suggests a mechanical feeding issue. Check how the sheet sits in the tray, make sure the paper guides are snug, try another supported feed tray, and inspect the feed rollers. A template or scaling error normally creates a more predictable pattern.
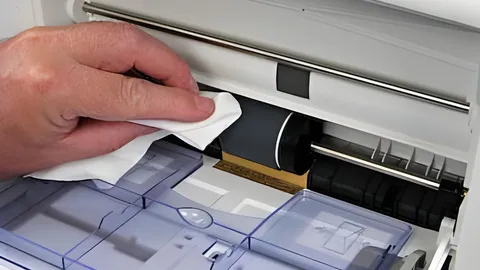
Dirty or worn feed rollers can slip while pulling the label sheet into the printer, causing the sheet to enter at a slightly different position or angle. This can make label alignment vary between print attempts. If you suspect the rollers, follow the cleaning procedure for your specific printer model, since cleaning methods and materials differ between manufacturers. See the Rollers check.
Yes. A plain sheet of paper and a glossy or heavy label sheet may travel through the same printer differently. That's why the correct media setting and feed tray can matter even when your template and print settings are correct. This can also explain why a plain-paper alignment test succeeds but the real label sheet does not.
Only if you also have print-quality problems such as misaligned lines, colors, or printhead output. Printhead alignment is different from positioning an entire label template on a sheet. If every label is printing too high, too low, left, right, or progressively drifting across the page, start with page scaling, margins, paper size, printer-driver settings, and paper feeding instead.
Due to the large number and nature of possible misalignment causes, people often end up printing multiple times,
wasting all of the above and feeling increasingly frustrated.
To troubleshoot effectively, follow this list of practical steps and techniques:
Don't rush the process; it's worth spending a few extra minutes to carefully examine each possible root cause. You'll only need to do it once.
Be aware that the Light Test might not reveal issues caused by the following printer settings and conditions related to paper thickness:
These answers help you verify alignment before using an adhesive sheet and explain why plain paper does not always behave like label stock.
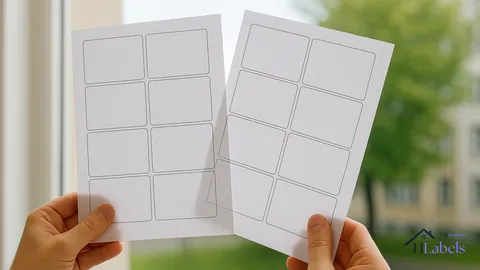
Print the layout on ordinary paper first. Place the test print over or behind the actual label sheet and compare the printed positions with the die-cut labels. An easy way to see the alignment precisely is the Light Test: hold the plain-paper printout and label sheet together against a bright window or lamp so the cut lines underneath become visible through the paper.
That points toward the printer and label material rather than the PDF layout. Label stock is usually thicker and may be coated, glossy, or more rigid than ordinary paper, which can change how the printer picks up and transports the sheet. Check the media type selected in the printer software, any physical media or paper-type setting on the printer, the paper tray, guides, and feed rollers.
If you've gone through the entire Gang of Five and still can't get the alignment right, there's a good chance one of them was missed or overlooked during troubleshooting.
The good news is that Hlabels offers free and fast support. Reach out, and we'll guide you through it one step at a time.
Make sure you checked the most likely causes first, starting with application page scaling and margins, followed by the other application print settings → printer-driver settings → printer feeding and hardware → template → label sheet. If you're using Hlabels and still can't identify the cause, contact us and we'll help you troubleshoot it step by step.

We respect your privacy and want you to have control over your data. Please choose your preferences: