How to print your own labels in Google Docs™ and Sheets™
Google Docs™ and Google Sheets™ don’t include built-in label printing features, but many third-party add-ons make it possible to design, merge, and print labels directly from these platforms. However, most fall short in one or more areas that matter most:
- Support only a limited number of label brands
- Lack support for Roll labels
- Lack support for custom label sizes or custom templates
- No built-in tools to correct printer alignment issues
- Complex mail merge processes for labels
The Label Sheets & Rolls add-on was built to eliminate these frustrations. It supports a wide range of label sheet brands, allows full customization of label sizes and templates, includes built-in alignment tools to fix printer shifts, and simplifies mail merge into a few easy steps.
This add-on takes a different approach: it keeps the user's focus on designing their labels, and automatically and seamlessly arranges them into the template layout.
Regarding privacy, this extension goes to great lengths to minimize access to your data, limiting it strictly to the information required to generate your printout.
Beyond the document or sheet you are actively working on, it does not access any of your Google files or personal data without your explicit, real-time consent.
If you choose to import data from a private Google Sheets™ file, you will be asked to grant permission; otherwise, the extension will not be able to access it.
Install the Label Sheets & Rolls add-on
This add-on can be installed directly from the Google Docs™ or Google Sheets™ editor via the Google Workspace Marketplace.
- Open the Google Docs™ or Google Sheets™ interface.
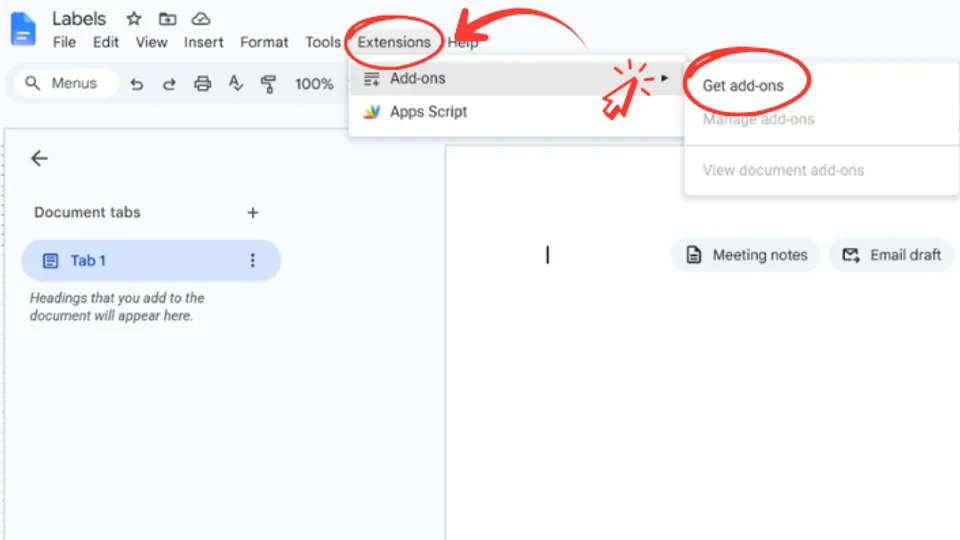
- From the menu bar, go to Extensions.
- Select Add-ons and click Get add-ons.
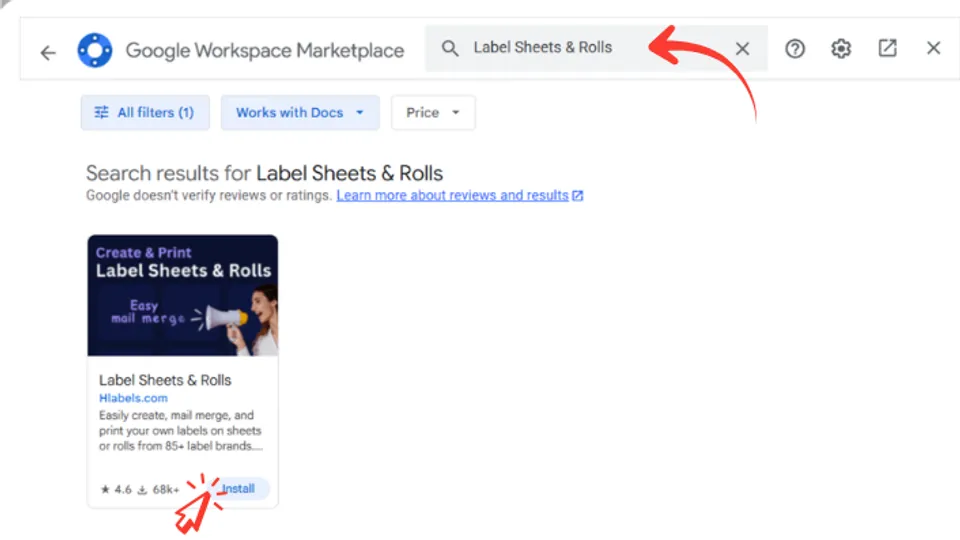
- Search for the Label Sheets & Rolls add-on and click Install
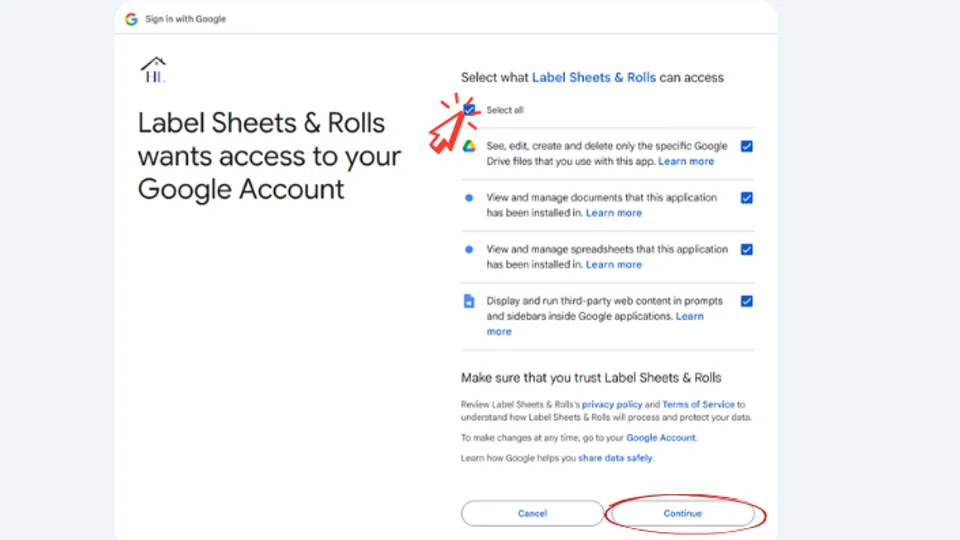
- Specify the permissions the add-on accesses.
Launch the Label Sheets & Rolls add-on
You can install and launch this add-on either through the Google Docs™ or Google Sheets™ editor or directly from our website,
on the Google Docs & Sheets label template page you are printing from - for example: Avery-5160.
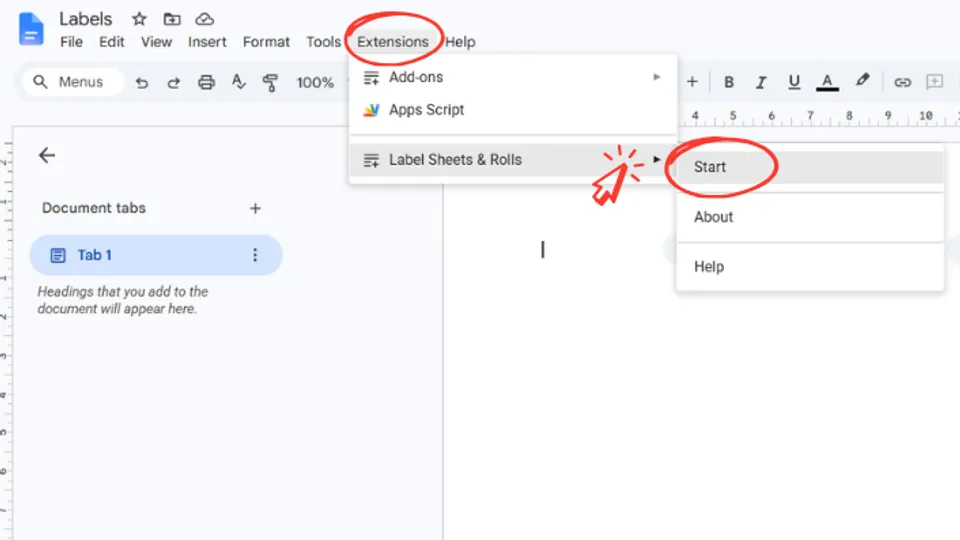
- From the menu bar, go to Extensions.
- Click on Label Sheets & Rolls and click Start.
Video walkthrough: How to install and start the Label Sheets & Rolls add-on
Print on Standard Label Sheets
Standard label sheets are pre-manufactured sheets of adhesive labels designed for use with common desktop printers. They come in standard sizes such as A4 or Letter and are produced by well-known manufacturers like Avery® and many other label brands worldwide. Each sheet contains multiple labels in a predefined layout, with perforated or die-cut labels that can be easily peeled off after printing.
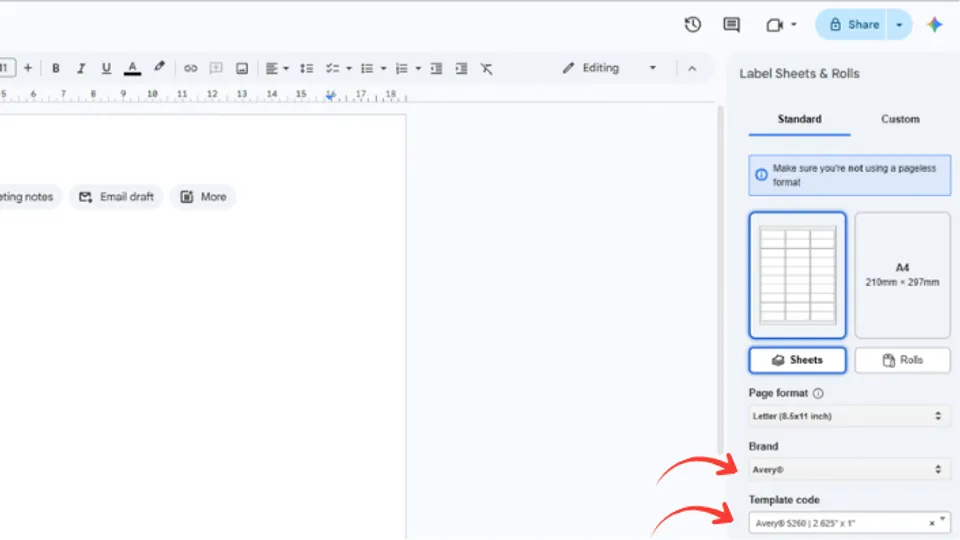
Select Brand and Template code
Each label sheet product is identified by its brand and template code.
Let’s suppose you are printing on Avery® 5260 label sheets.
To let the app know that, make the following selections in the app’s user interface:
- Select the Standard tab
- Select the Letter Page format (since Avery 5260 uses Letter size)
- Select the Avery Brand
- Select Avery 5260 as the Template code. Since the list of template codes can be long, you can start typing your template code to search for it.
Once you have selected the template code, the add-on will automatically display the option to manage the alignment and positioning of the label sheet printout. This document includes a dedicated section for this, so you can skip it for now.
Select the number of different labels to create
A label sheet contains multiple labels, and the way you distribute different labels across the sheet falls into three main categories.
Let’s use Avery® 5260, which contains 30 labels, as an example:
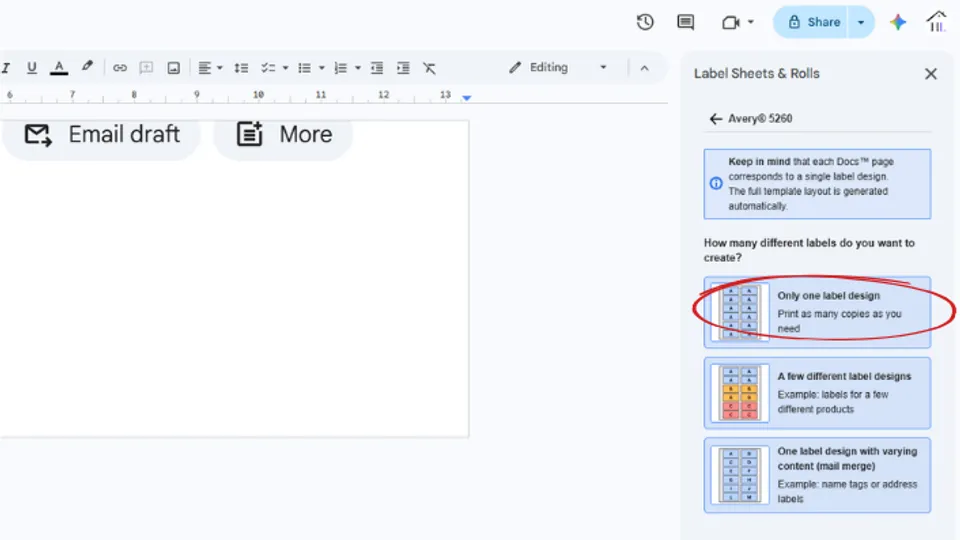
- You create only one label design and print it across the entire sheet. This results in 30 identical labels.
Jump to this section to learn how to continue with this option.
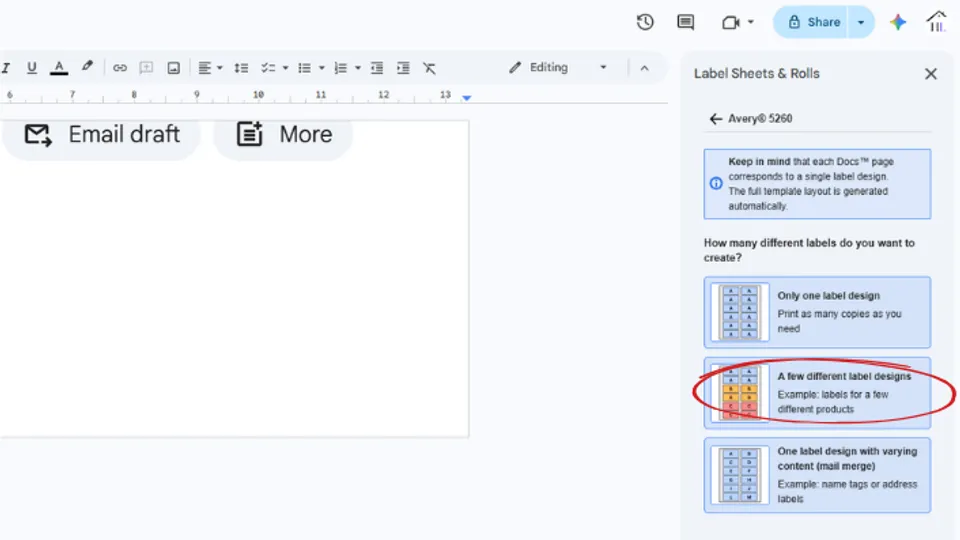
- You create a few different label designs and distribute them across the sheet.
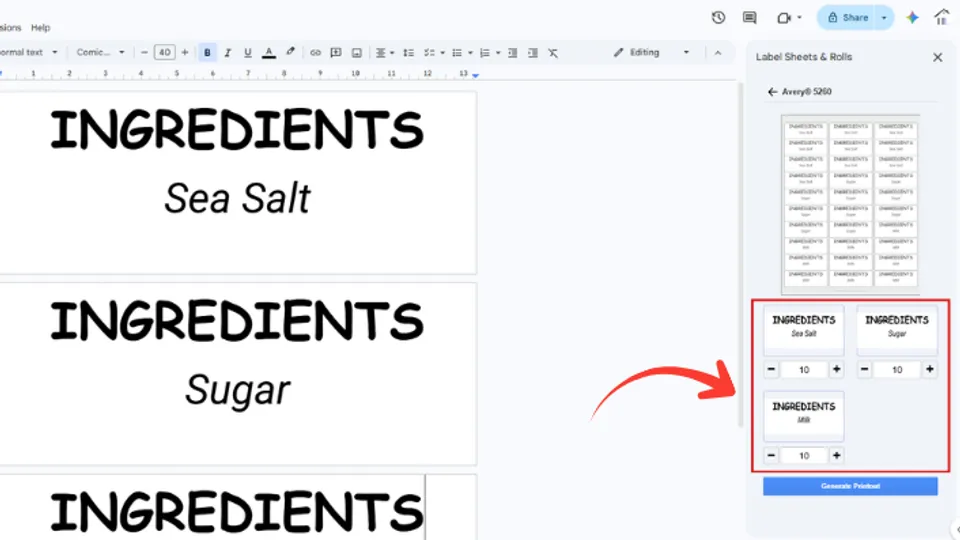
For example, if you create three different label designs (Google Docs™ or Google Sheets™ document pages), you can print 10 of each on one sheet. You can of course use any other combination.
Jump to this section to learn how to continue with this option.
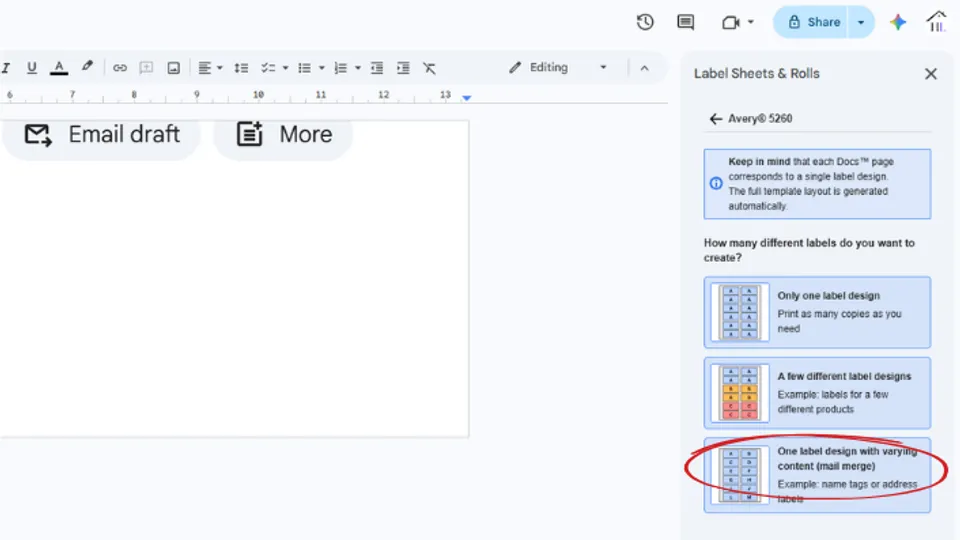
- You create one label design, but the content on each label (or part of it) is different and comes from data in an Excel file or Google Sheets spreadsheet. In this case, the add-on automatically reads the data from the file and generates hundreds or thousands of labels.
Jump to this section to learn how to continue with this option.
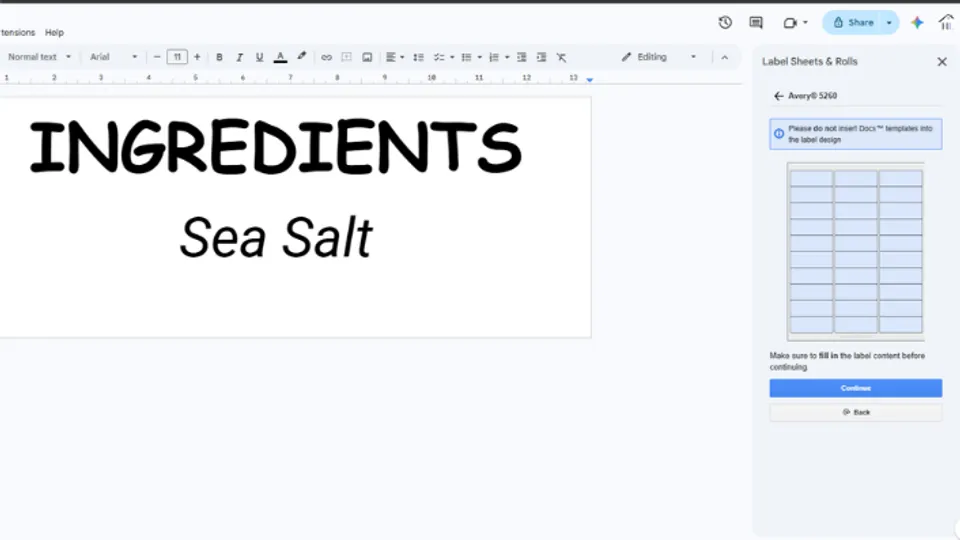
Create and Print one label design only
Once you select the Only one label design option, you can begin designing your label.
Follow these steps:
- Design the label
Add text, images, and formatting until it is complete.
- Generate label sheet
Once you have finished designing your label, click the Continue button.
The app will take this label, repeat it across the label sheet template, and generate a print-ready layout.
Alignment and positioning of the layout are set automatically, but you can adjust them when needed. See this section for details.
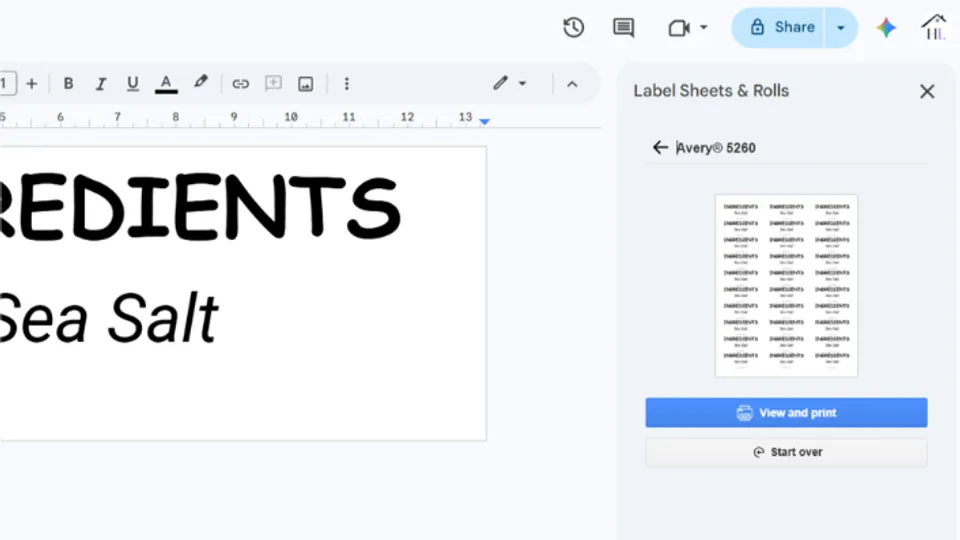
- View and print
Jump to this section for more information on how to view and print the generated label sheet.
Video walkthrough: Repeat the Same Label Design Across a Label Sheet Printout in Google Docs
Create and Print multiple label designs
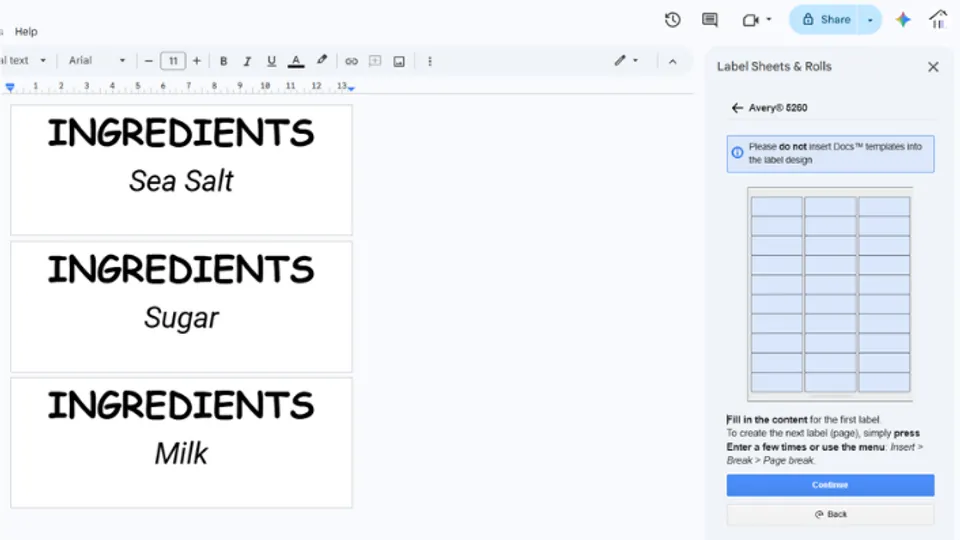
Once you select the A few different label designs option, you can begin designing your labels. Each Canva page represents one label.
Follow these steps:
- Design the label
Add text, images, and formatting until it is complete.
- Add and design more labels
To create additional labels, simply add a new document page for each one. You can add as many pages (labels) as needed. Once you have finished designing your labels, click the ‘Continue’ button.
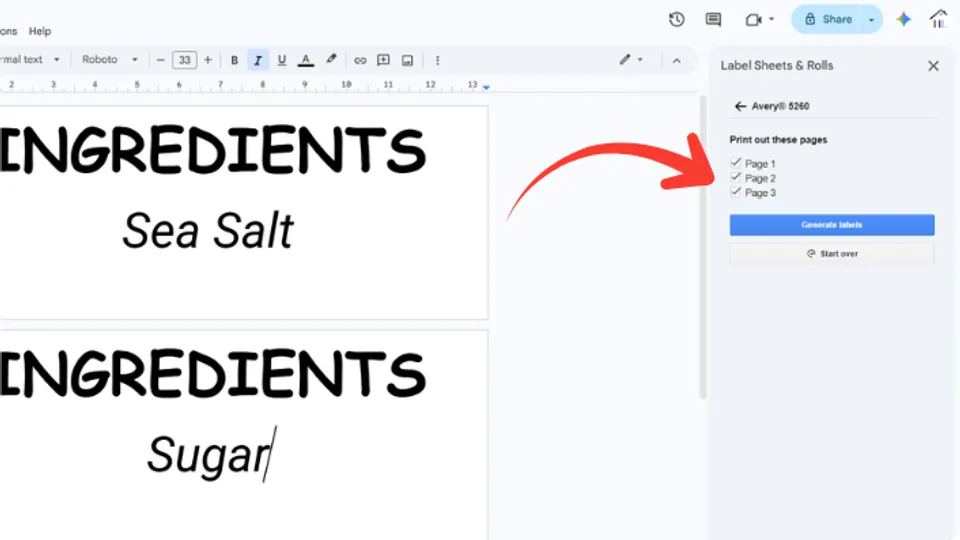
- Confirm labels to include
Next, the add-on prompts you to confirm which labels to include in the final printout. Click the Generate labels button to continue.
- Adjust label quantities per sheet
The add-on shows a preview of how each label design is distributed across the sheet and allows you to adjust the quantities.
- Generate printout
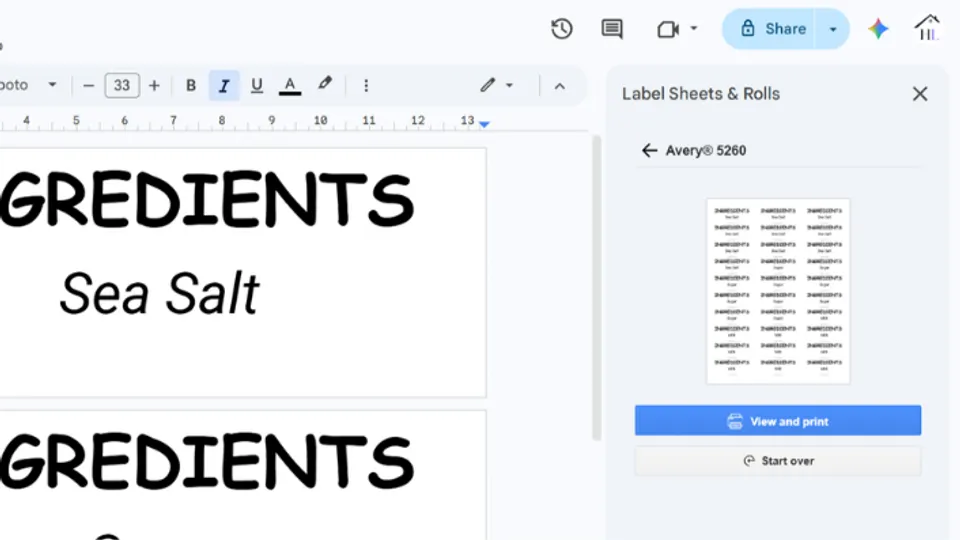
Click the Generate printout button. The add-on will generate the print-ready layout and display a preview. If the printout spans multiple label sheet pages, only the first two pages are shown in the preview. The remaining pages are indicated below as a number.
Alignment and positioning are set automatically, but you can adjust them if needed—see the section below for details.
- View and print
Jump to the section below for more information on how to view and print the generated label sheets.
Video walkthrough: How to Insert Different Label Designs on One Label Sheet Printout in Google Docs
Create and Print Labels using data from a spreadsheet (Mail Merge)
When you need to print a large number of labels where each one contains different information, designing them manually becomes time-consuming and error-prone. This is common in cases like address labels, product labels with unique SKUs or barcodes, name badges, or shipping labels—where the design remains the same (including layout, images, formatting, and background), but some of the text content changes for each label.
This add-on’s mail merge process solves this by combining a single label design with data from an Excel file and automatically generating a different label for each row of data. Instead of creating each label one by one, you design once, specify where each piece of data should appear, and the add-on automatically populates the dynamic content across all labels while simultaneously generating the final label sheet printout.
Start by adding the static content—the elements that will be the same across all labels (you will work on a single document page).
Upload from Spreadsheet
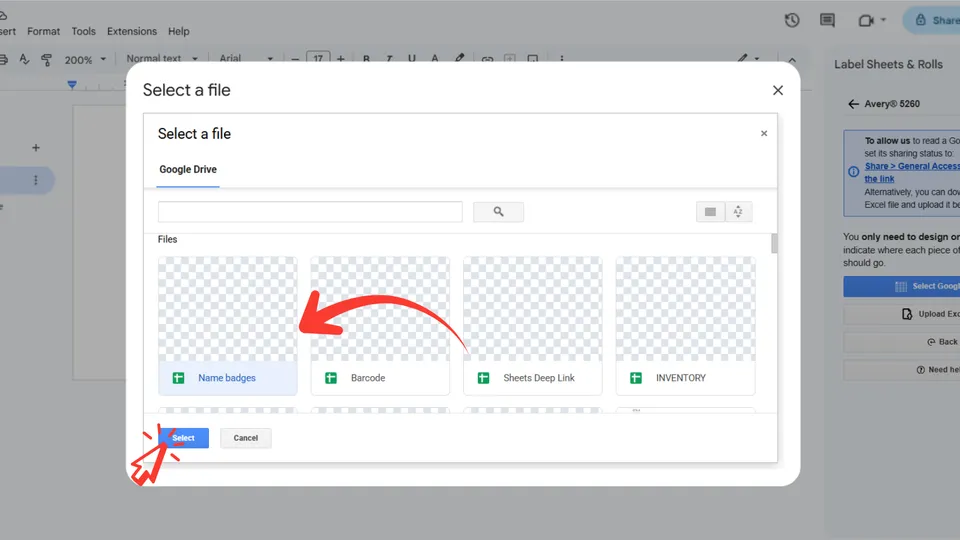
When done, click the blue Select Google Sheet button.
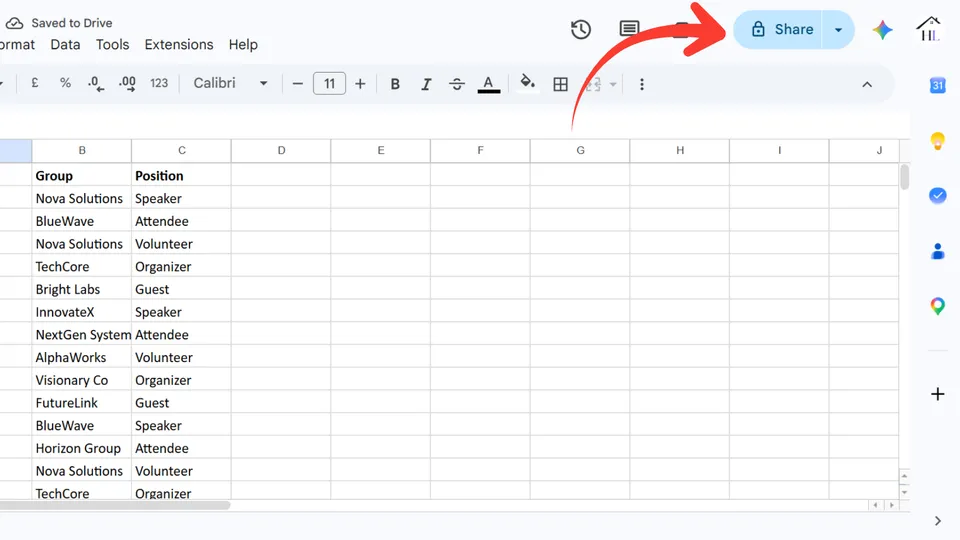
- Select the spreadsheet from the Google Drive files.
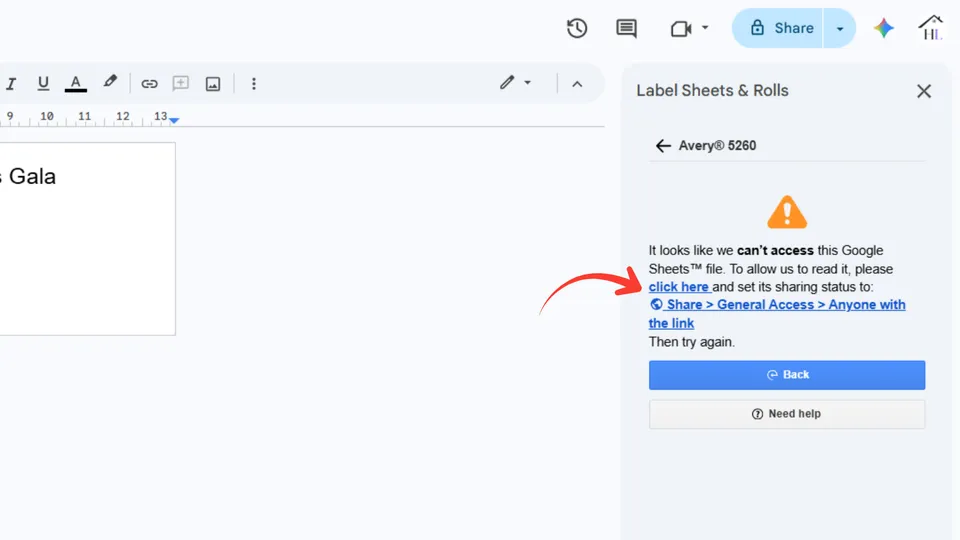
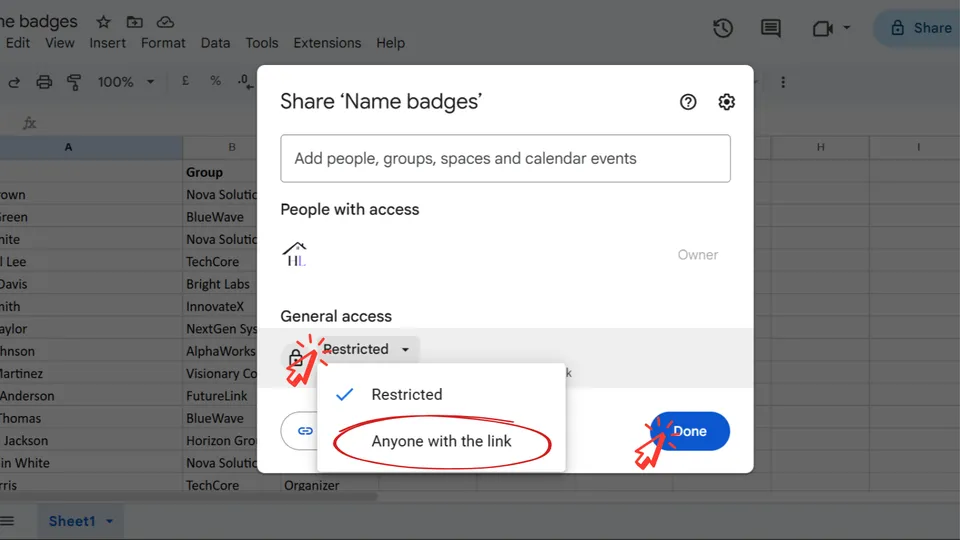
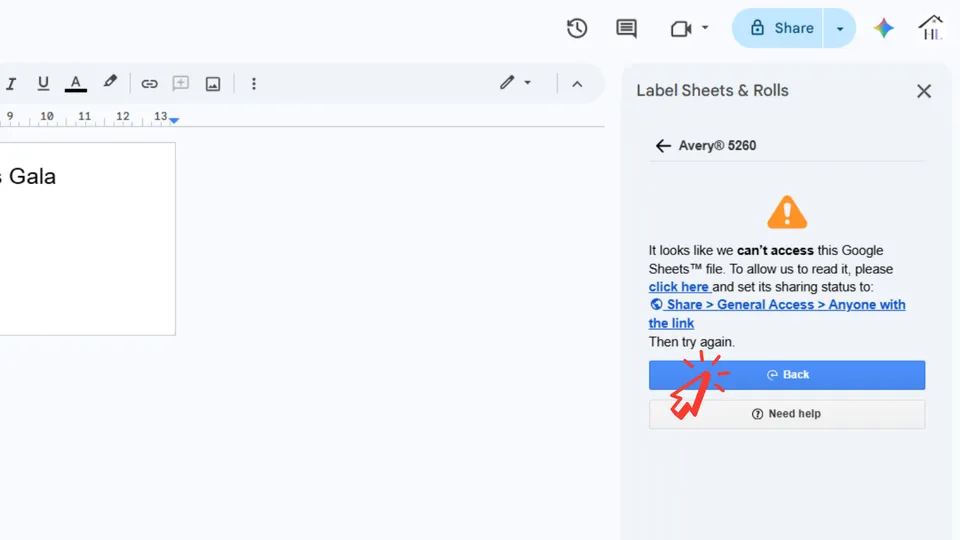
- Open the spreadsheet to change its sharing status.
- Set its sharing status to anyone with the link.
- Go back to reselect the spreadsheet.
Video walkthrough: Mail Merge Labels from Google Sheets
Upload from Excel
When done, click 'Select Google Sheet' button.
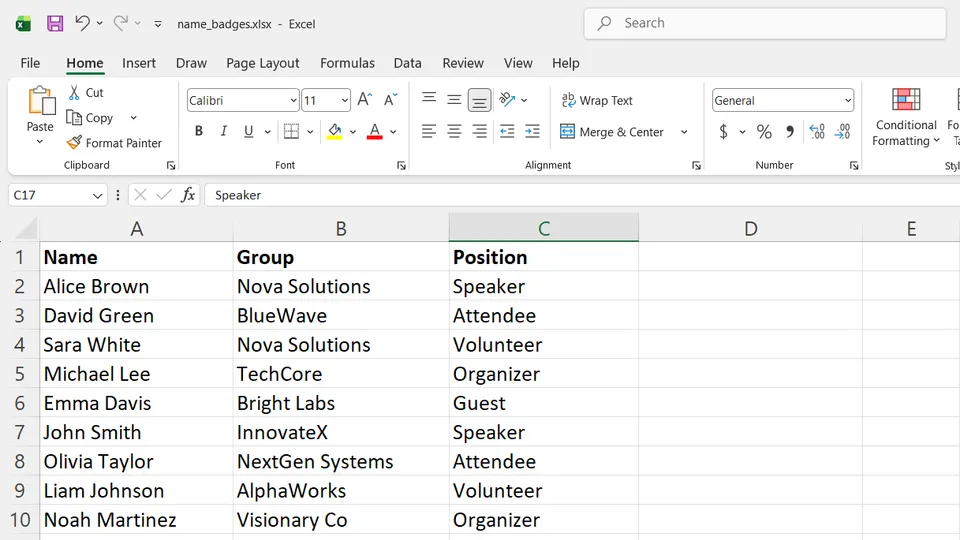
- Make sure the Excel sheet is structured correctly:
-
The first row must contain descriptive column headers that represent the type of data in each column.
-
Each row below must contain the values that will be inserted into a single label. The sheet may also include additional columns, even if they are not used on the labels.
-
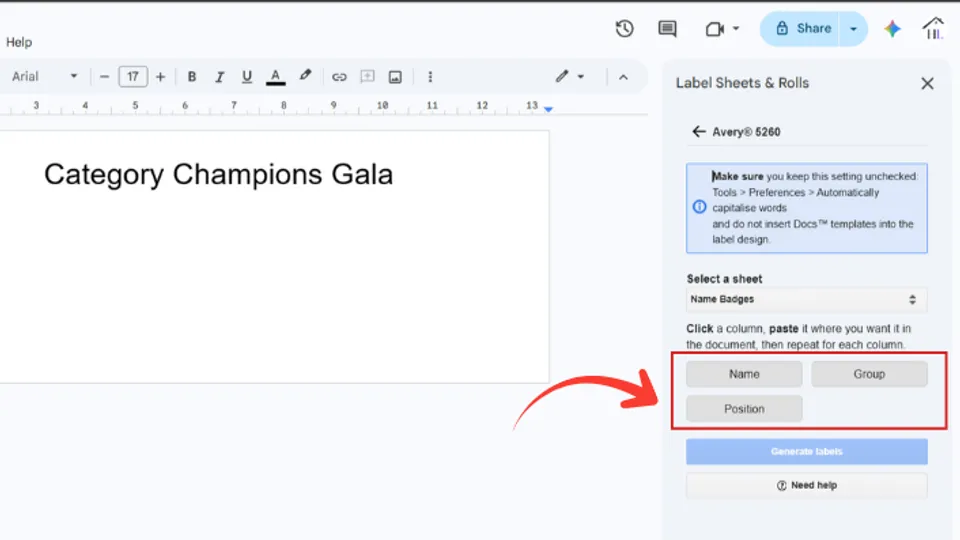
The add-on reads the Excel file and displays the column headers from the first sheet.
Each column name appears as a button. If the file contains multiple sheets, you can switch between them.
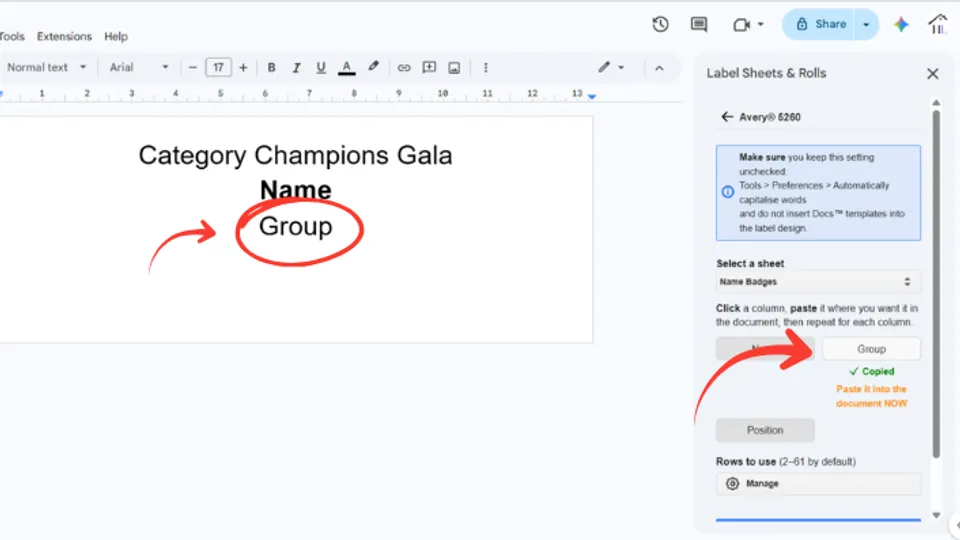
- Assign where each column’s values should appear in the label.
To do this, follow these two simple steps:
-
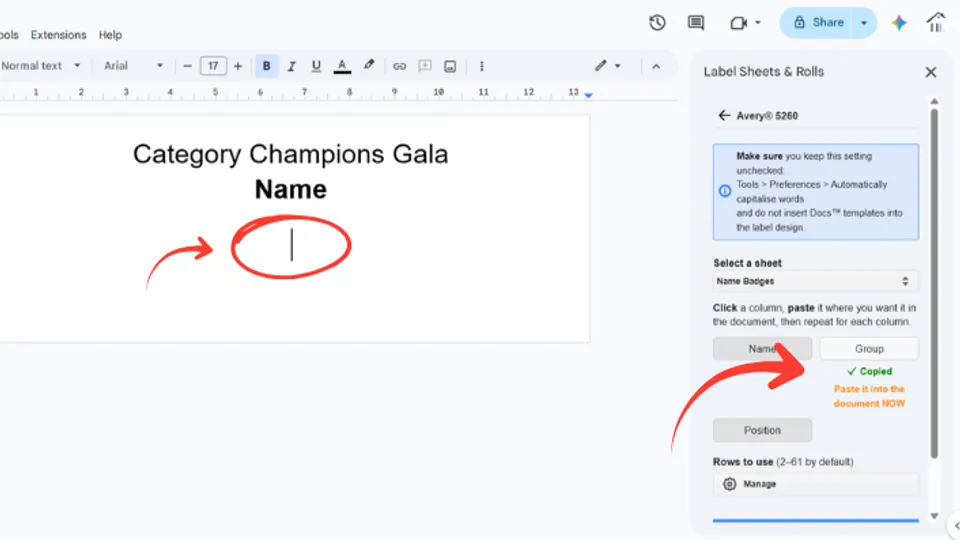
Click the button with the name of the column whose data you want to place in the label. This will copy the column name to the clipboard so you can paste it into the label.
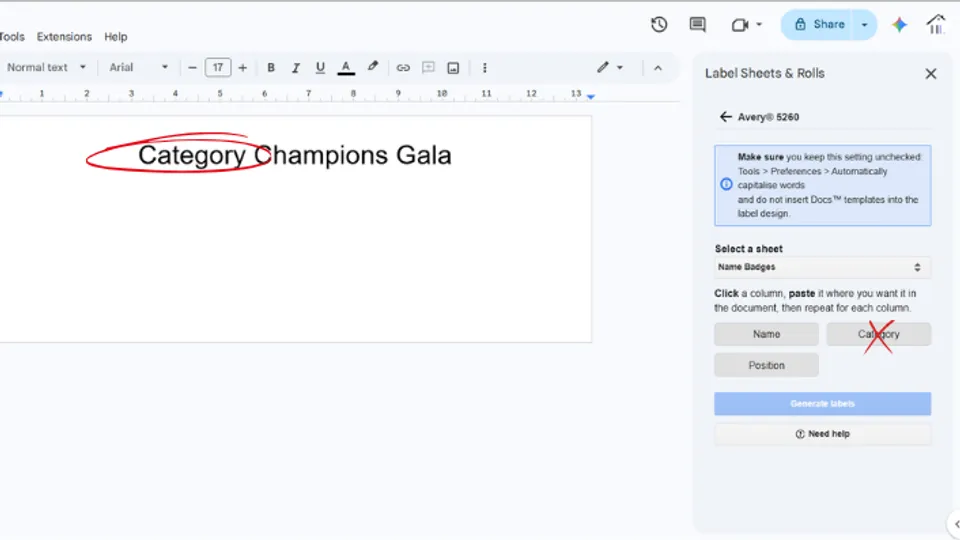
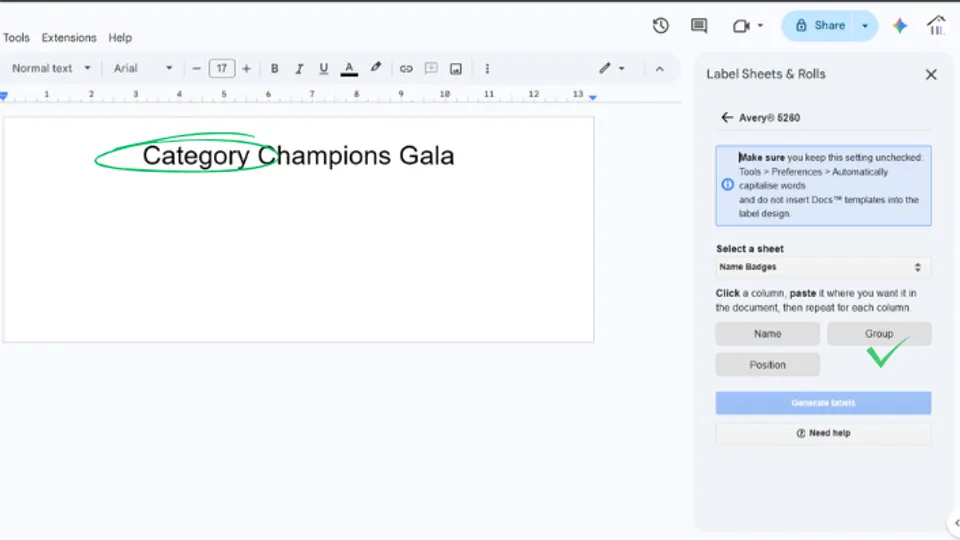
Note: When the label contains static text (text that is the same through all the labels), make sure that no word from the fixed text is the same as the column name. If that is the case, please modify that column name in the Excel file.
-
Immediately after clicking the button, place the cursor where you want that piece of data to appear and paste it (e.g., Ctrl+V).
Repeat these steps for each column you want to include in the label.
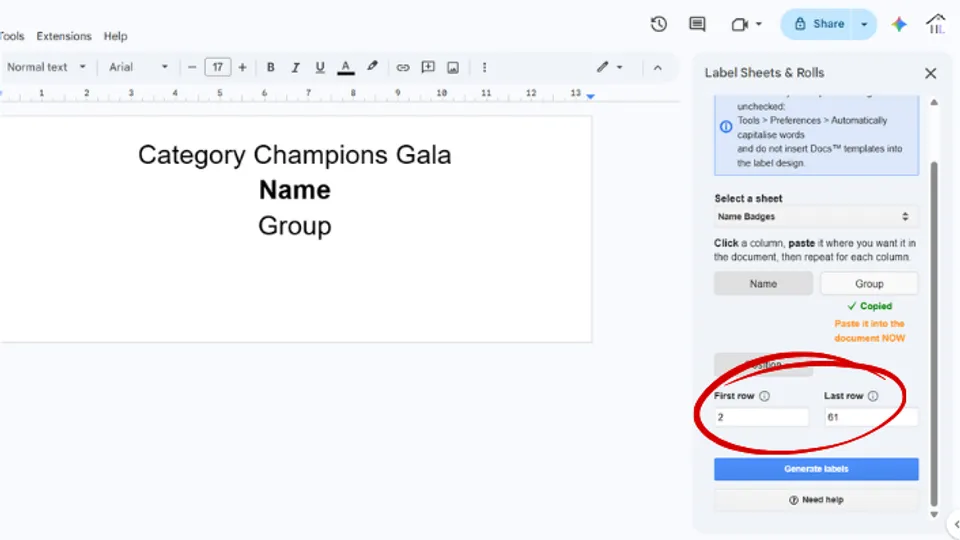
- Select row range
The add-on allows you to generate up to 200 labels at a time. You can select any range of rows to define which data is used—the first row marks where extraction begins, and the last row marks where it ends.
- Generate labels
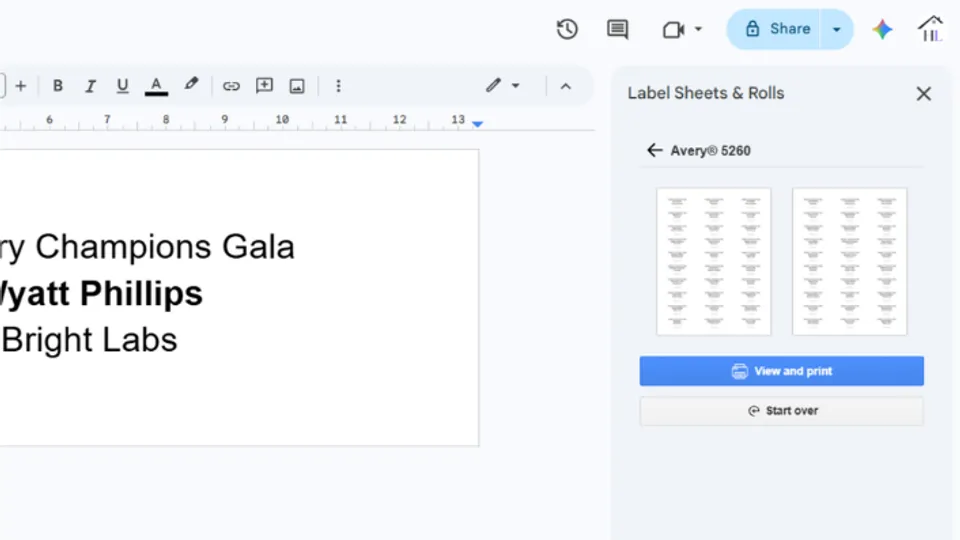
Click the Generate labels button. The add-on will read each row, generate the corresponding labels, and arrange them into a print-ready label sheet layout.
If the printout spans multiple label sheet pages, only the first two pages are shown in the preview. The remaining pages are indicated below as a number.
Alignment and positioning are set automatically, but you can adjust them if needed—see the section below for details.
- View and print
Jump to the section below for more information on how to view and print the generated label sheets.
Video walkthrough: Mail merge labels using data from an Excel file
View and print
Once the printout has been generated and a preview is displayed, click the ‘View and print’ button to continue.
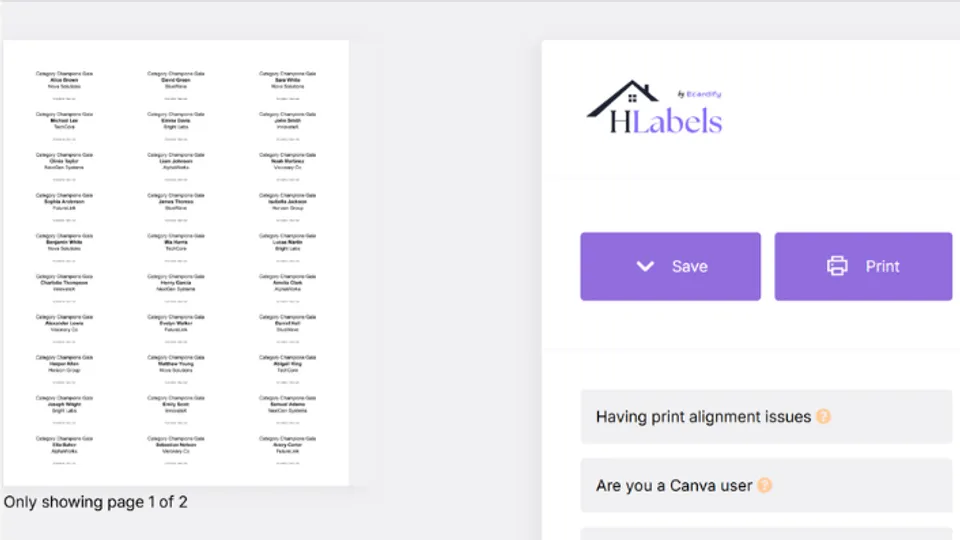
The add-on will open a new window showing the label sheet printout. If there is more than one page, only the first page will be displayed. You will also see two buttons: ‘Save’ and ‘Print’.
Save for later printing
Click the ‘Save’ button to download the printout as a PDF file to your computer. You can print it at any time using any PDF reader.
Print right away
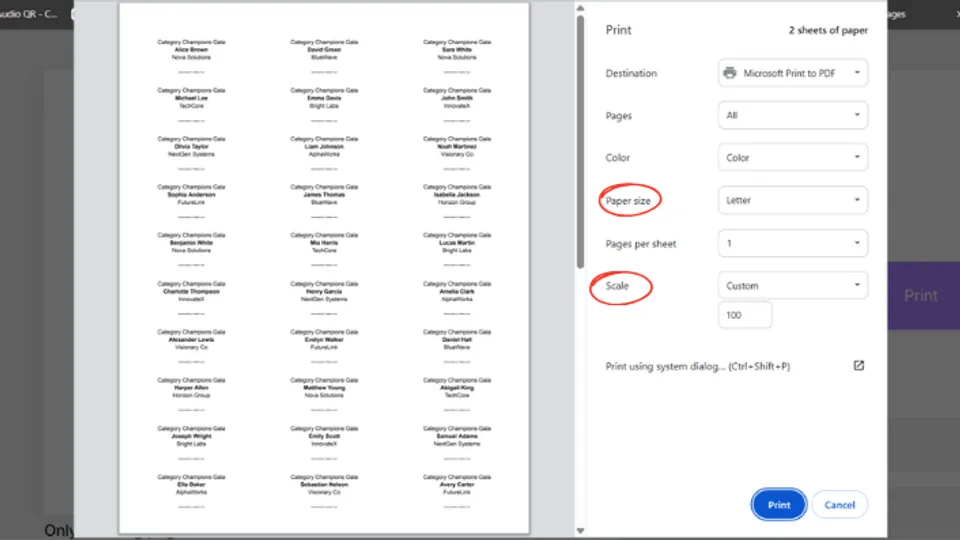
Click the ‘Print’ button to send the printout directly to your inkjet or laser printer. In the dialog that appears, make sure to click the ‘More settings’ link and review the following settings:
- Layout - set to Portrait
- Paper size - set to either Letter or A4
- Scale - set to Actual size
If you encounter print alignment issues, this document will help you identify the cause and apply a fix. Small misalignments caused by the printer can be compensated through the Alignment & Positioning settings. You can also contact us for assistance.
Print on Custom Label Sheets
Custom label sheets allow you to define your own label layout when standard templates are not suitable or not available. Instead of using predefined sizes, spacing, and margins, you can set the exact label dimensions, gaps, and page margins to match your specific needs.
Use custom label sheets when:
- You are printing on plain adhesive sheets and plan to cut the labels yourself
- You want a more cost-effective alternative to pre-cut (die-cut) label sheets
- You cannot find a matching brand or template code for your label product
- You have measured your labels and want to recreate the layout manually
By defining your own layout, you can print labels on virtually any sheet format, even if it is not currently supported by predefined templates.
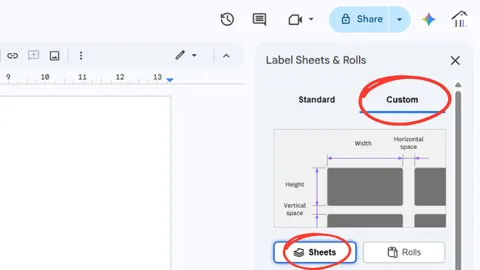
To define a custom label sheet layout and print on it, select the Custom tab at the top of the add-on panel, then click the Sheets button.
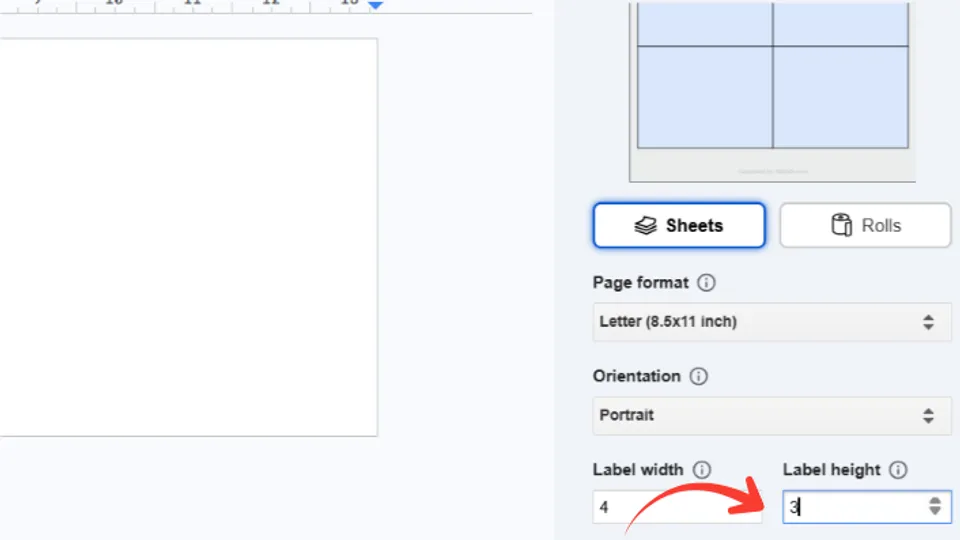
Enter the following information:
- Page format
The add-on supports the two standard paper sizes used worldwide: Letter (8.5 × 11 inches) and A4 (210 × 297 mm). Select the one you use.
- Orientation
If you want your label images to be inserted vertically (i.e., rotated -90 degrees) into each label, just set this field to "Landscape", and the app will automatically rotate them and generate the label sheet printout accordingly.
This setting works the same way for custom, standard and roll label layouts.
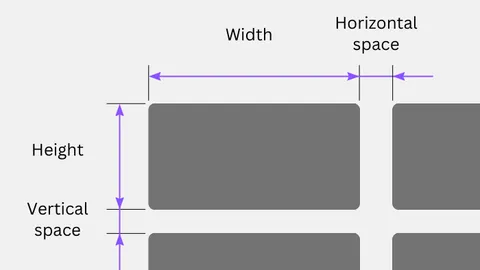
- Label width
This is the width of a single label.
- Label height
This is the height of a single label.
Ensure the label’s width-to-height ratio matches the document page size.
For this reason, based on the label width (which you should enter first), the add-on automatically suggests a label height value for you.
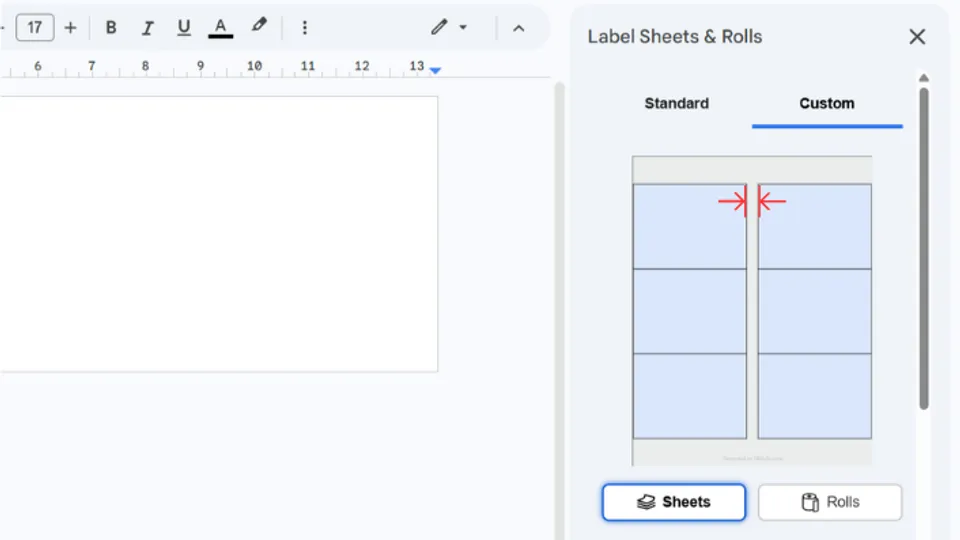
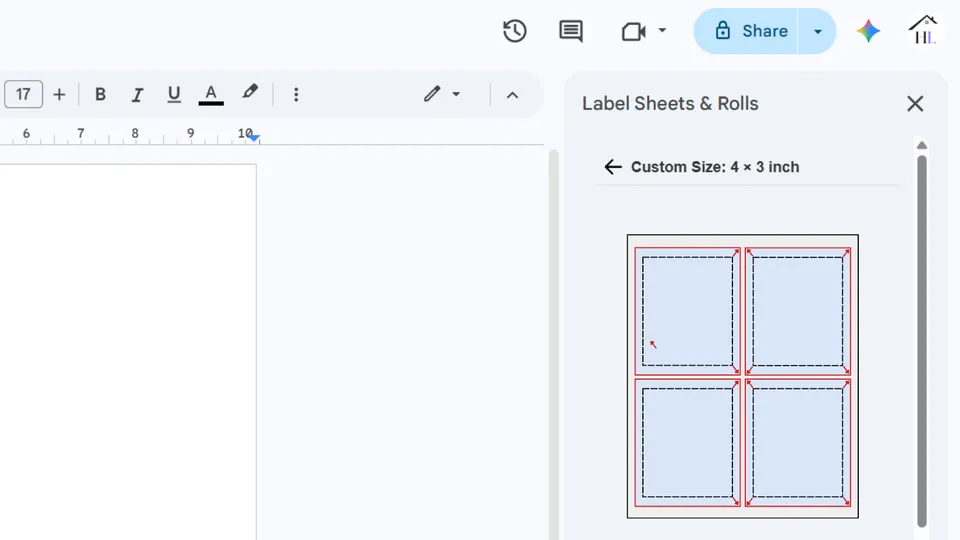
- Horizontal space
This setting controls the horizontal space between labels.
If you’re cutting labels yourself, leave this value as zero. Otherwise, if you’re using an existing label sheet layout and have the sheets on hand, measure and enter this distance as accurately as possible. Even small inaccuracies can add up across the sheet and cause noticeable misalignment in the printout.
For your convenience, changes to this value are instantly reflected in the layout preview at the top of the add-on panel.
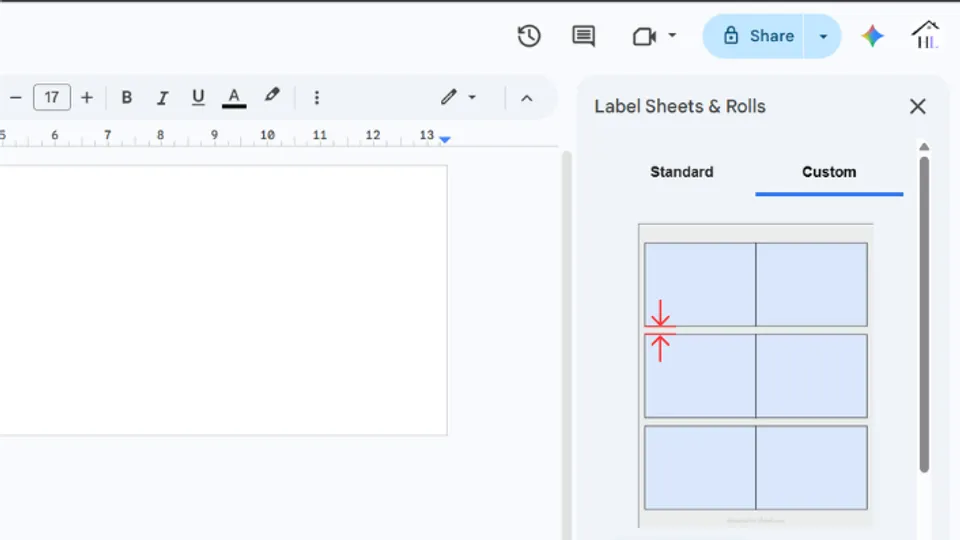
- Vertical space
This setting controls the vertical space between labels.
If you’re cutting labels yourself, leave this value as zero. Otherwise, if you’re using an existing label sheet layout and have the sheets on hand, measure and enter this distance as accurately as possible. Even small inaccuracies can add up across the sheet and cause noticeable misalignment in the printout.
For your convenience, changes to this value are instantly reflected in the layout preview at the top of the add-on panel.
Once all values are set and you have visually confirmed the layout in the preview, click the ‘Continue’ button. The next dialog in the app provides several settings that affect how labels are placed, aligned, and displayed on the sheet:
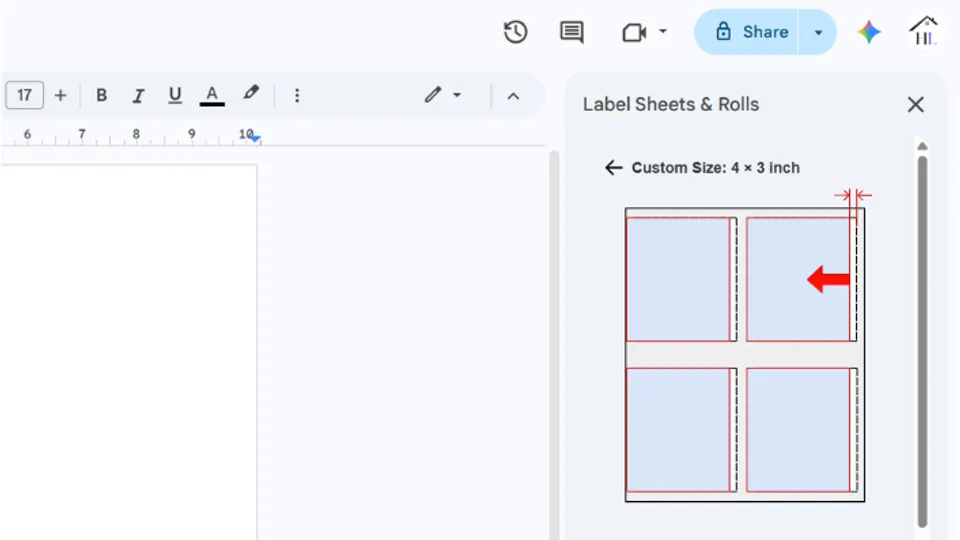
- Horizontal offset
This setting works the same way for both standard and custom label layouts.
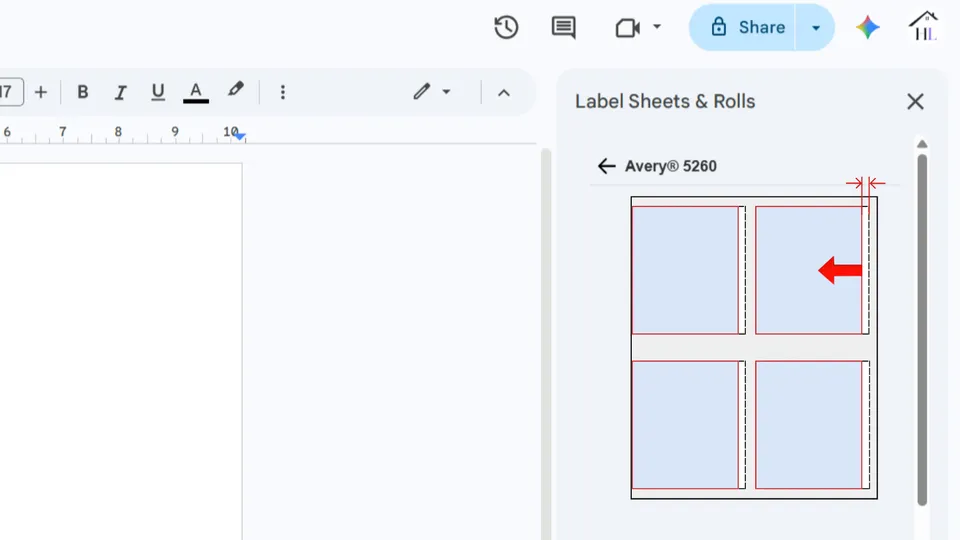
When the paper sheet sits slightly to the left or right in the printer tray, labels may print off-center.
This setting lets you apply a horizontal offset of 1 to 3 mm to correct the alignment.
This setting works the same way for both custom and standard label layouts.
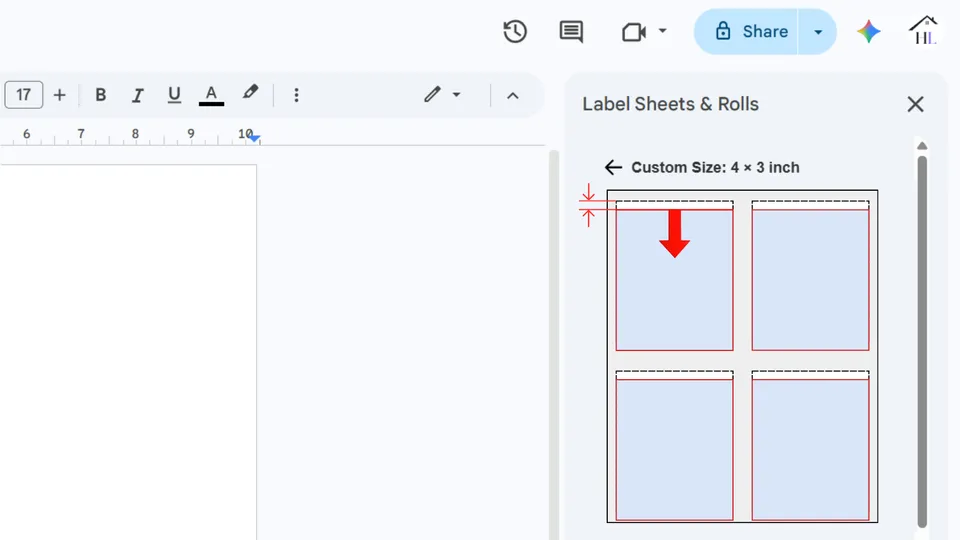
- Vertical offset
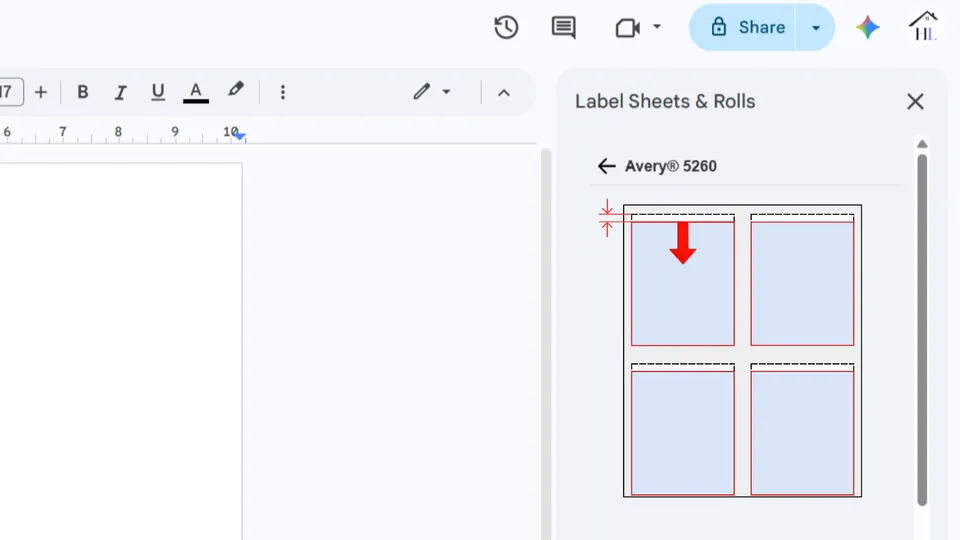
Inkjet and laser printers are not always completely precise when feeding paper vertically,
which can cause labels to print slightly above or below their intended positions on the sheet.
This setting allows you to apply a vertical offset of 1 to 3 mm to compensate for misalignment caused by imperfect vertical feed.
This setting works the same way for both custom and standard label layouts.
- Bleed area
When the background color of your label design does not match the color of the physical label, which is usually white,
slight printing misalignments can cause a thin white edge to appear along one or more sides of the printed label.
A simple and effective way to avoid this is to print the label slightly larger than the label area, so the background extends beyond the label's actual edge.
This method is called applying a bleed.
If you notice white edges, select a bleed area between 1% and 5%, depending on how much coverage you need.
This setting works the same way for custom, standard and roll label layouts.
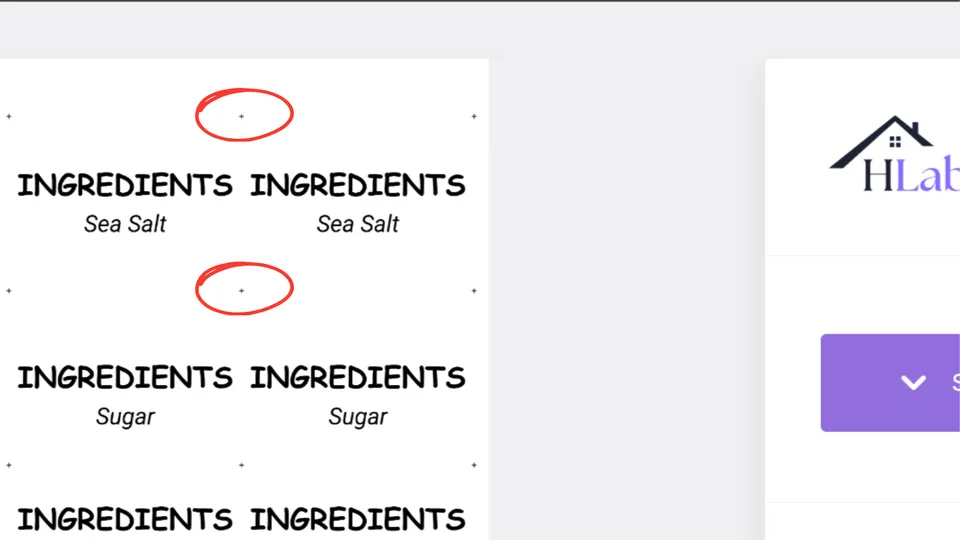
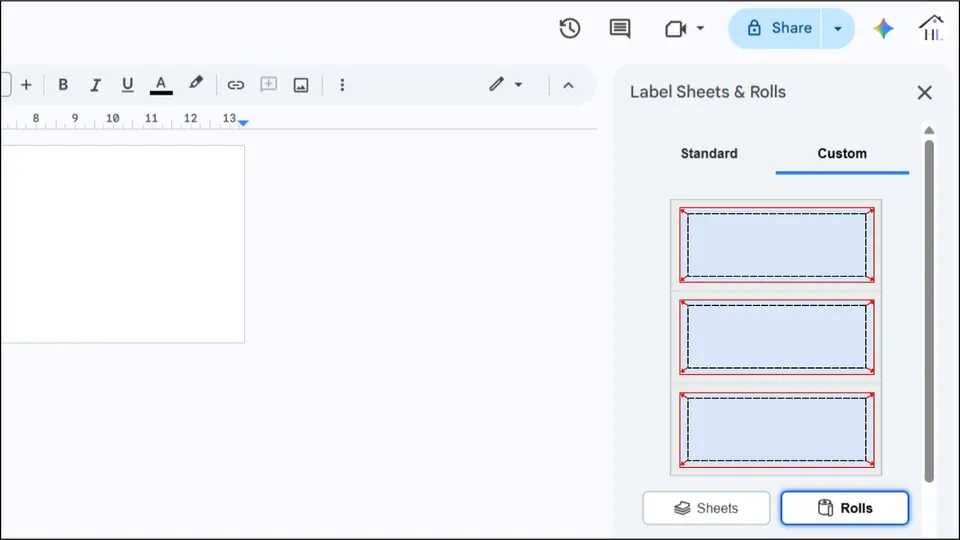
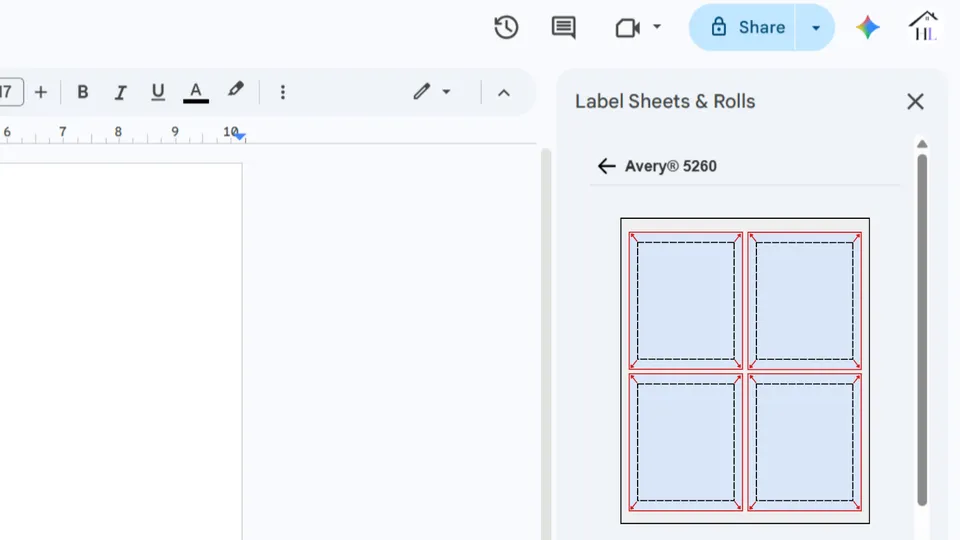
- Cutting marker
If there are no spaces between the labels and you plan to print them on plain paper and cut them out yourself, set this option to Yes. The app will print cross-shaped guides at the corners of each label to make cutting easier and more precise.
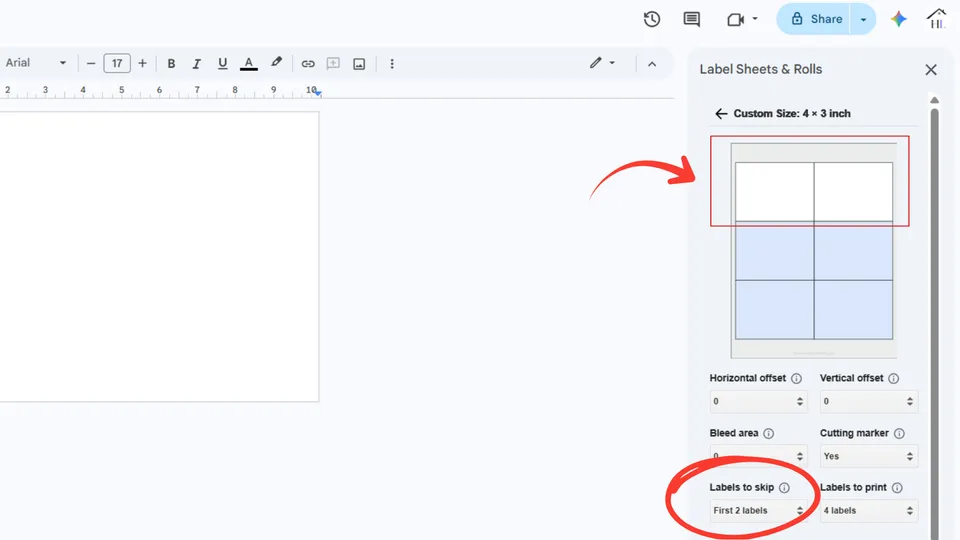
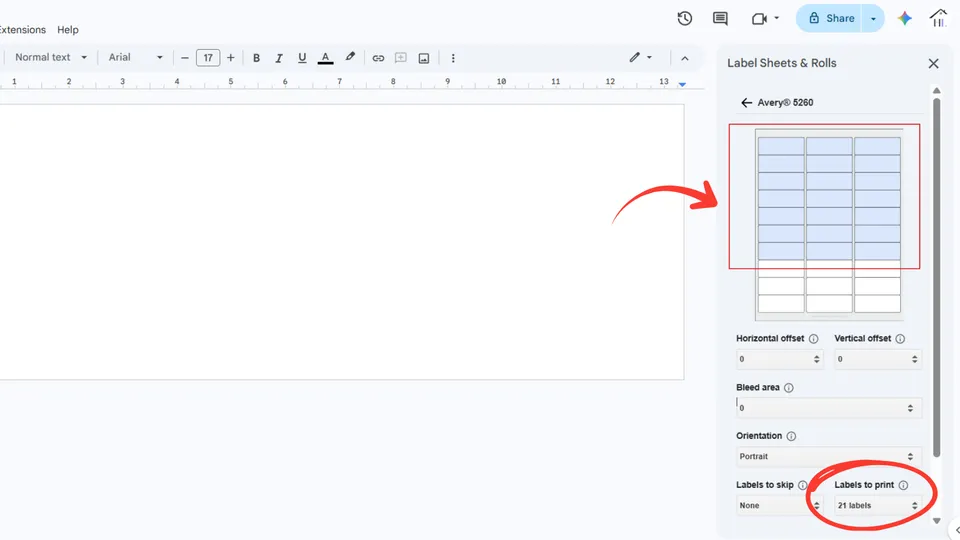
- Labels to skip
Set this field to the number of labels that have already been printed on and peeled off the sheet and should therefore be skipped in this printout.
This setting lets you reuse a partially used label sheet and print only on the remaining labels, helping you avoid wasting the entire sheet.
The maximum value of this field is one less than the number of labels per sheet.
This setting works the same way for both custom and standard label layouts.
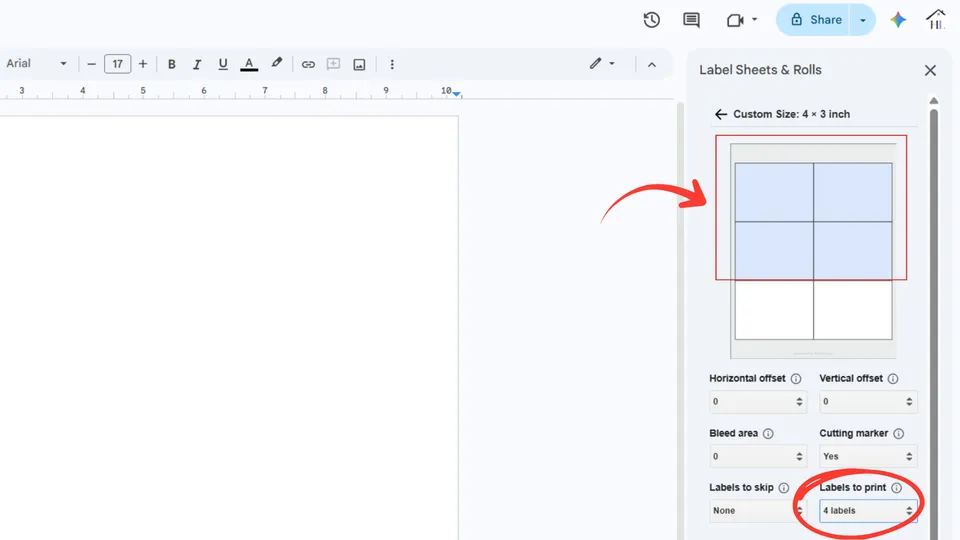
- Labels to print
Set this field to the number of labels you want to print on the first label sheet of the printout.
If the number of label designs (document pages) exceeds the number of available label positions on the first sheet, the remaining labels will be printed on additional sheets.
This setting works the same way for both custom and standard label layouts.
For your convenience, changes to any of these settings are instantly reflected in the layout preview at the top of the add-on panel.
Once all values are set and you have visually confirmed the layout in the preview, click the Continue button.
The remaining steps are the same as for Standard Label Sheets. See the Select the number of different labels to create section and follow the instructions there.
Video walkthrough: How to Create a Custom Label Template in Google Docs & Sheets
Print on Custom Label Rolls
Custom label rolls allow you to print on any roll format, even though predefined roll templates are not currently included in the system. Unlike label sheets, rolls are simpler to define because they require fewer measurements, typically just the label size, gap, and roll width, making setup quick and straightforward.
This means you can easily configure a custom roll to match standard roll products from any manufacturer, without needing a predefined template.
In practice, using custom label rolls is nearly as simple as selecting a standard template, while giving you the flexibility to work with virtually any roll label format.
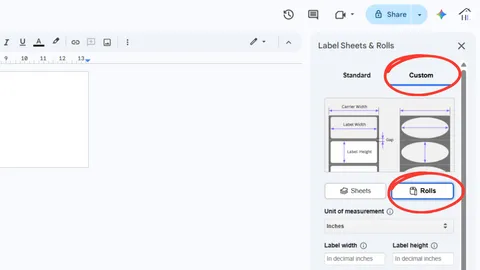
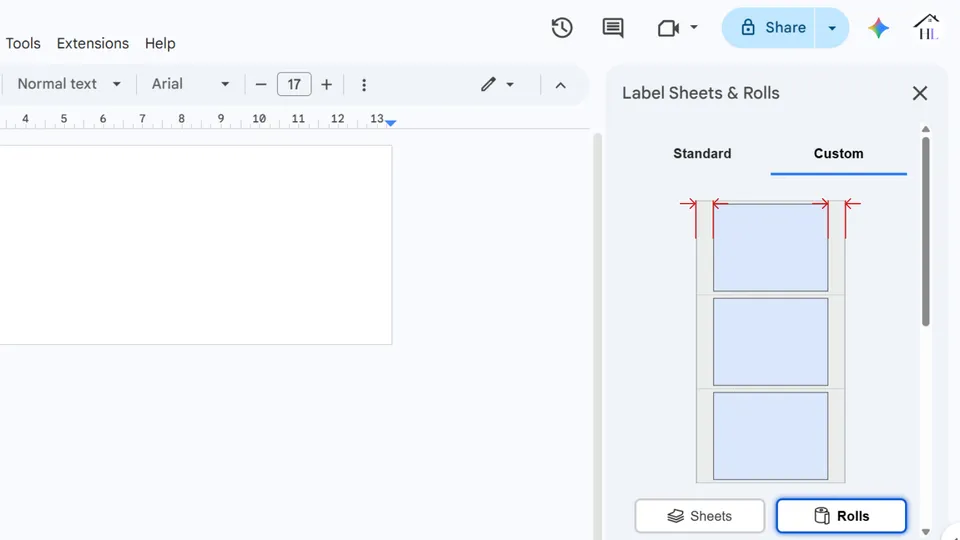
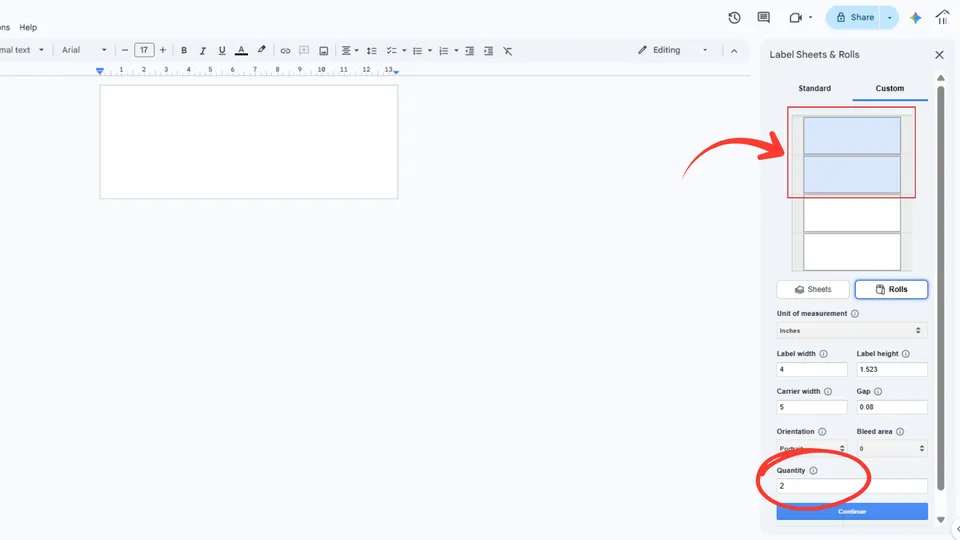
To define a custom roll layout and print on it, select the Custom tab at the top of the add-on panel, then click the Rolls button.
Enter the following information:
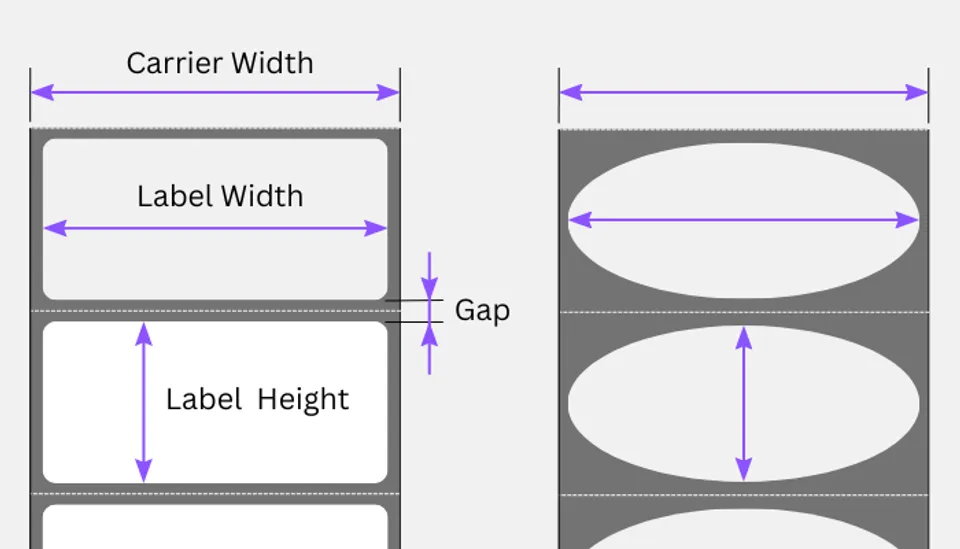
- Label Width
The width of a single label.
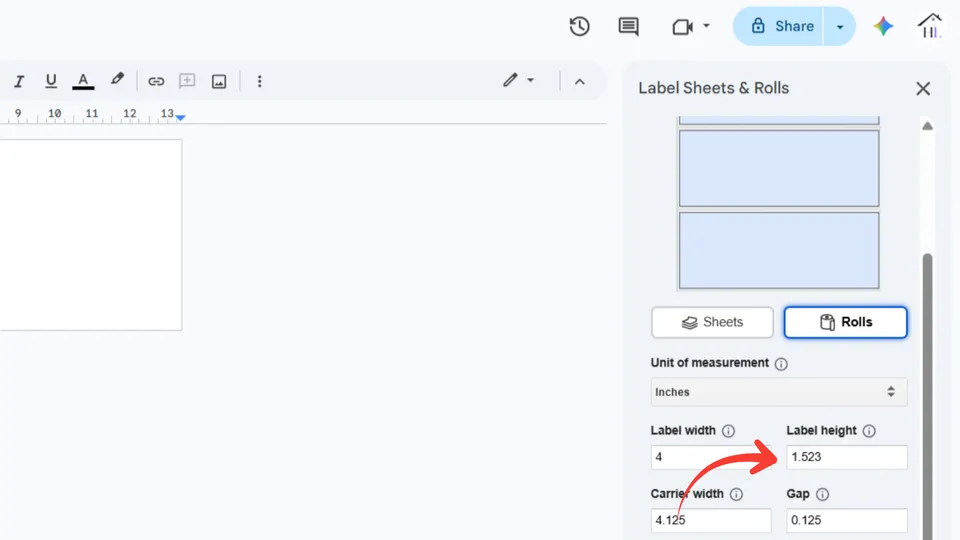
- Label Height
This is the height of a single label.
Ensure the label’s width-to-height ratio matches the document page size.
For this reason, based on the label width (which you should enter first), the add-on automatically suggests a label height value for you.
This is the height of a single label.
Ensure that the label’s width-to-height ratio matches the document’s width-to-height ratio; otherwise, unwanted empty space may appear around the printed labels.
For this reason, based on the label width you enter first, the app automatically suggests a corresponding label height.
- Carrier Width
The specifications of the roll should include the width of the carrier of labels, which is usually
slightly larger than the width of the label, to allow for margin space on both sides.
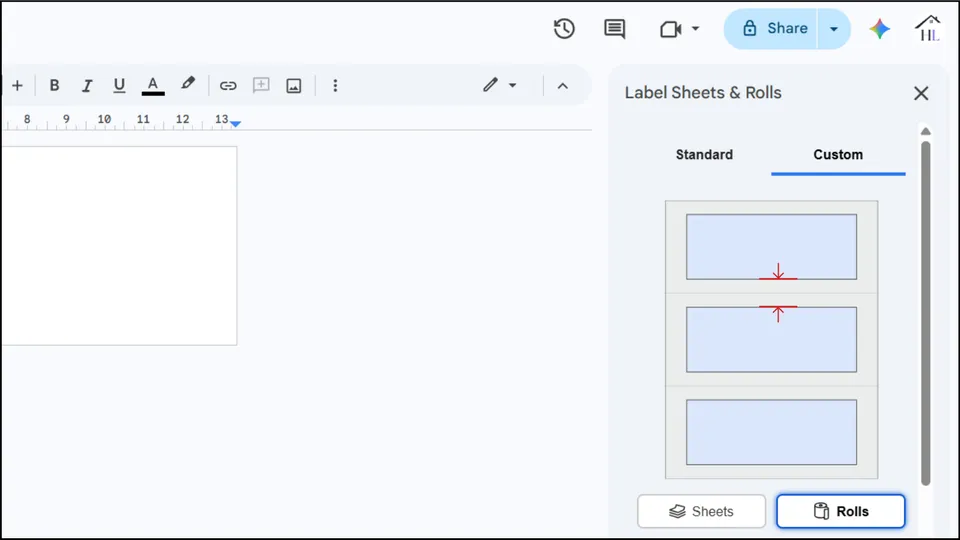
- Gap
Labels on a roll are usually spaced slightly apart from each other.
The specifications of your label roll should list this as the Gap dimension.
- Orientation
If you want your label images to be inserted vertically (i.e., rotated -90 degrees) into each label just set this field to "Landscape",
and the app will automatically rotate them and generate the label sheet printout accordingly.
This setting works the same way for roll, standard and custom label layouts.
- Bleed area
When the background color of your label design does not match the color of the physical label, which is usually white,
slight printing misalignments can cause a thin white edge to appear along one or more sides of the printed label.
A simple and effective way to avoid this is to print the label slightly larger than the label area, so the background extends beyond the label's actual edge.
This method is called applying a bleed.
If you notice white edges, select a bleed area between 1% and 5%, depending on how much coverage you need.
This setting works the same way for roll, custom and standard label layouts.
- Quantity
The number of labels you want to print.
Video walkthrough: How to Create a Custom Roll Label Template in Google Docs
Manage Alignment & Positioning
As noted in the Print on Custom Label Sheets section, the add-on provides several settings that affect how labels are placed, aligned, and displayed on the sheet.
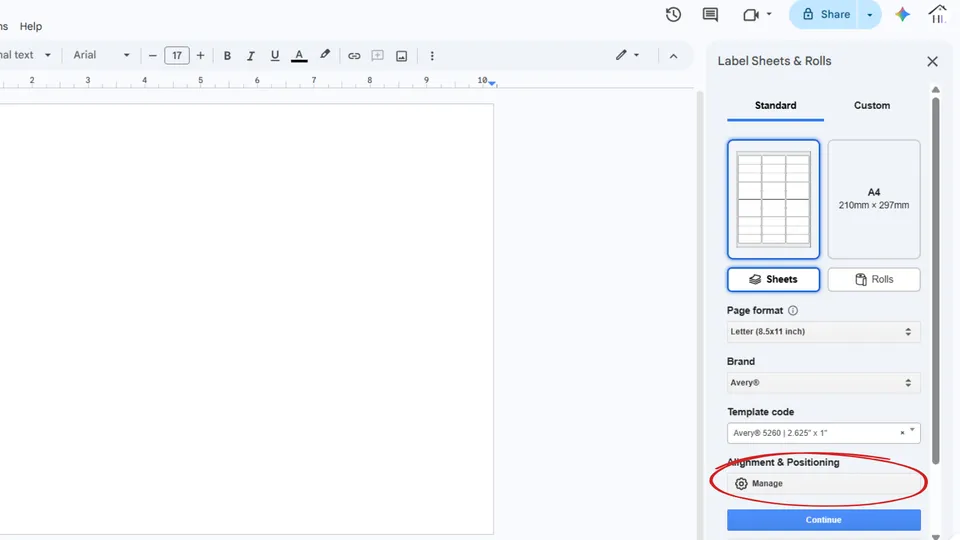
When printing on Standard Label Sheets, these settings are grouped in a dedicated dialog, which you can access by clicking the Manage button.
The Alignment & Positioning dialog contain the following fields:
- Horizontal offset
This setting works the same way for both standard and custom label layouts.
When the paper sheet sits slightly to the left or right in the printer tray, labels may print off-center.
This setting lets you apply a horizontal offset of 1 to 3 mm to correct the alignment.
This setting works the same way for both standard and custom label layouts.
- Vertical offset
Inkjet and laser printers are not always completely precise when feeding paper vertically,
which can cause labels to print slightly above or below their intended positions on the sheet.
This setting allows you to apply a vertical offset of 1 to 3 mm to compensate for misalignment caused by imperfect vertical feed.
This setting works the same way for both standard and custom label layouts.
- Bleed area
When the background color of your label design does not match the color of the physical label, which is usually white,
slight printing misalignments can cause a thin white edge to appear along one or more sides of the printed label.
A simple and effective way to avoid this is to print the label slightly larger than the label area, so the background extends beyond the label's actual edge.
This method is called applying a bleed.
If you notice white edges, select a bleed area between 1% and 5%, depending on how much coverage you need.
This setting works the same way for standard, roll and custom label layouts.
- Orientation
If you want your label images to be inserted vertically (i.e., rotated -90 degrees) into each label just set this field to "Landscape",
and the app will automatically rotate them and generate the label sheet printout accordingly.
This setting works the same way for standard, roll and custom label layouts.
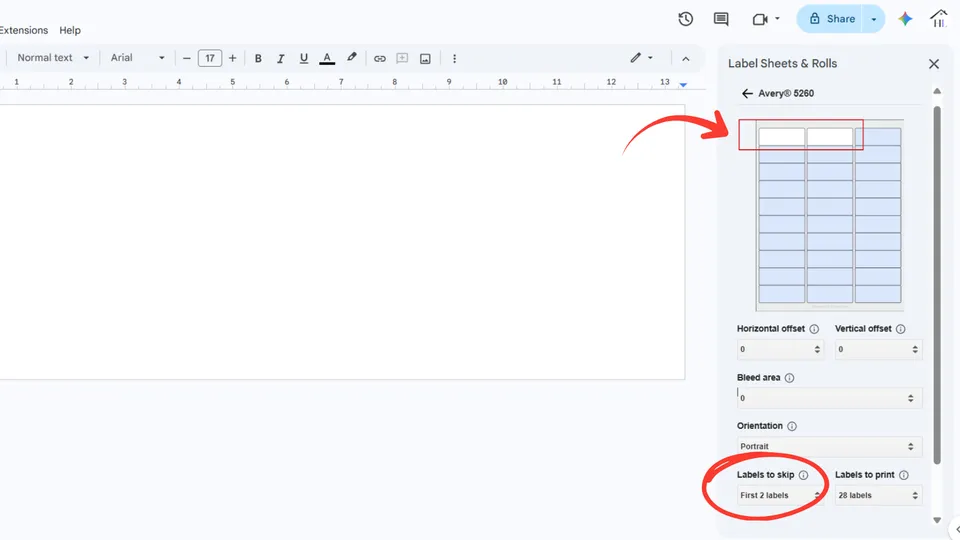
- Labels to skip
Set this field to the number of labels that have already been printed on and peeled off the sheet and should therefore be skipped in this printout.
This setting lets you reuse a partially used label sheet and print only on the remaining labels, helping you avoid wasting the entire sheet.
The maximum value of this field is one less than the number of labels per sheet.
For example, the Avery® 5260 template contains 30 labels, so the maximum possible value is 29.
The screenshot below shows what happens when this value is set to 4. The preview updates automatically.
This setting works the same way for both standard and custom label layouts.
- Labels to print
Set this field to the number of labels you want to print on the first label sheet of the printout.
If the number of label designs (document pages) exceeds the number of available label positions on the first sheet, the remaining labels will be printed on additional sheets.
This setting works the same way for both standard and custom label layouts.
When you print on a Standard Label Sheet and adjust any of these settings, the add-on remembers them and pre-fills their values the next time you use the same label sheet product.
Video walkthrough: How to Manage the Layout of a Label Sheet Printout with the Google Docs Label Sheets & Rolls Add-on
Google Sheets™
The Google Sheets™ add-on is better suited for quickly generating simple labels by merging data from the current Google Sheets file,
though the label design options are very basic.
After launching the add-on and selecting the template brand and code, or defining a custom label sheet or roll,
the add-on opens a window with a text area scaled to match a single label. In this area,
you can insert static content and placeholders mapped to columns from the current Google Sheets file.
The add-on then automatically generates the complete set of labels by merging spreadsheet data into these placeholders,
producing a fully formatted, print-ready PDF layout.
Video walkthrough: Mail Merge Labels in Google Sheets
Send to your printer
With one click, our add-on generates and displays the printout pages. You can then send them directly to your printer or save them as a PDF for future use.
Still have questions?
If you didn’t find what you were looking for, or something isn’t clear, feel free to reach out. We’re happy to help.
We meet you where you are. Learn
how to use our label printing service from within
Canva,
Microsoft Word,
Adobe Express,
or even directly from your browser.
If you already have one or more label designs saved as PNG or JPG image files, you can upload them to our website and generate a ready-to-print PDF.
 Go to Add-on